首页 > 资源 > 文章详情
GKE 推理网关:为 AI 工作负载打造专属流量入口
什么是 GKE 推理网关?
简单来说,GKE 推理网关(Inference Gateway)是 Google Kubernetes Engine(GKE)提供的一种专为 AI 和机器学习(特别是生成式 AI)工作负载设计的“智能网关”。它建立在标准的 GKE Gateway API 之上,但增加了许多针对 AI 推理场景的优化功能。您可以把它理解为一个知道如何与 AI 模型和加速器(如 GPU/TPU)高效协作的流量管理器,从而简化 AI 应用的部署、管理和观测。
它解决了哪些核心问题?
在 GKE 上运行 AI 推理服务,尤其是大型语言模型(LLM),会面临一些独特的挑战,而 GKE 推理网关正是为了解决这些痛点而生:
1. 加速器资源利用率低:GPU/TPU 等硬件成本高昂。传统的负载均衡器(如轮询)无法感知模型服务器的内部状态(例如 KVCache 使用情况),可能将请求发送到繁忙或无法高效处理的副本上,导致宝贵的加速器资源闲置或过载。
2. 多模型部署成本高且复杂:当需要部署多个模型,或像 LoRA(Low-Rank Adaptation)这样针对不同任务的多个微调模型时,为每个模型都分配独立的 GPU/TPU 会非常昂贵。如何在共享的硬件上高效地部署和管理这些模型是一个难题。
3. 流量管理不够智能:AI 应用的请求通常需要根据“模型名称”而非简单的 URL 路径来路由。同时,不同任务(如实时聊天 vs. 离线分析)对延迟的敏感度也不同,需要差异化的服务质量保障。
GKE 推理网关的核心功能
为了解决上述问题,GKE 推理网关提供了以下几项强大的功能:
为推理优化的负载均衡:它能够监控模型服务器的关键指标(如 KVCache 利用率、待处理请求队列长度),从而将请求智能地分配给最合适的后端副本。这能最大限度地提高 GPU/TPU 的利用率,降低推理延迟。
动态 LoRA 微调模型部署:支持在同一个基础模型和共享的加速器上,动态加载和提供多个 LoRA 微调模型服务。这意味着您可以用更少的硬件资源,同时为多个定制化任务提供服务,显著降低成本。
模型感知的路由(Model-aware Routing):可以直接从客户端请求的内容中识别出要调用的模型名称,并据此进行路由。这使得管理不同版本的模型、进行 A/B 测试或金丝雀发布变得非常简单。
部署重要性(Criticality)划分:您可以为不同的模型或任务设置优先级(例如 Critical、Standard)。当系统资源紧张时,网关会优先保障高优先级任务(如在线聊天)的请求,并主动拒绝或丢弃低优先级任务(如批量处理),确保核心业务的稳定性。
为推理优化的自动扩缩:它可以将模型服务器的负载指标与 GKE 的 Pod 横向自动扩缩器(HPA)结合,实现更精准、更高效的资源伸缩。
集成的 AI 安全与可观测性:
▫ 安全:可与 Google Cloud 的 Model Armor 集成,在网关层面对请求和响应进行安全检查。
▫ 可观测性:提供丰富的指标,如请求速率、延迟、错误率等,帮助您全面监控推理服务的性能和健康状况。
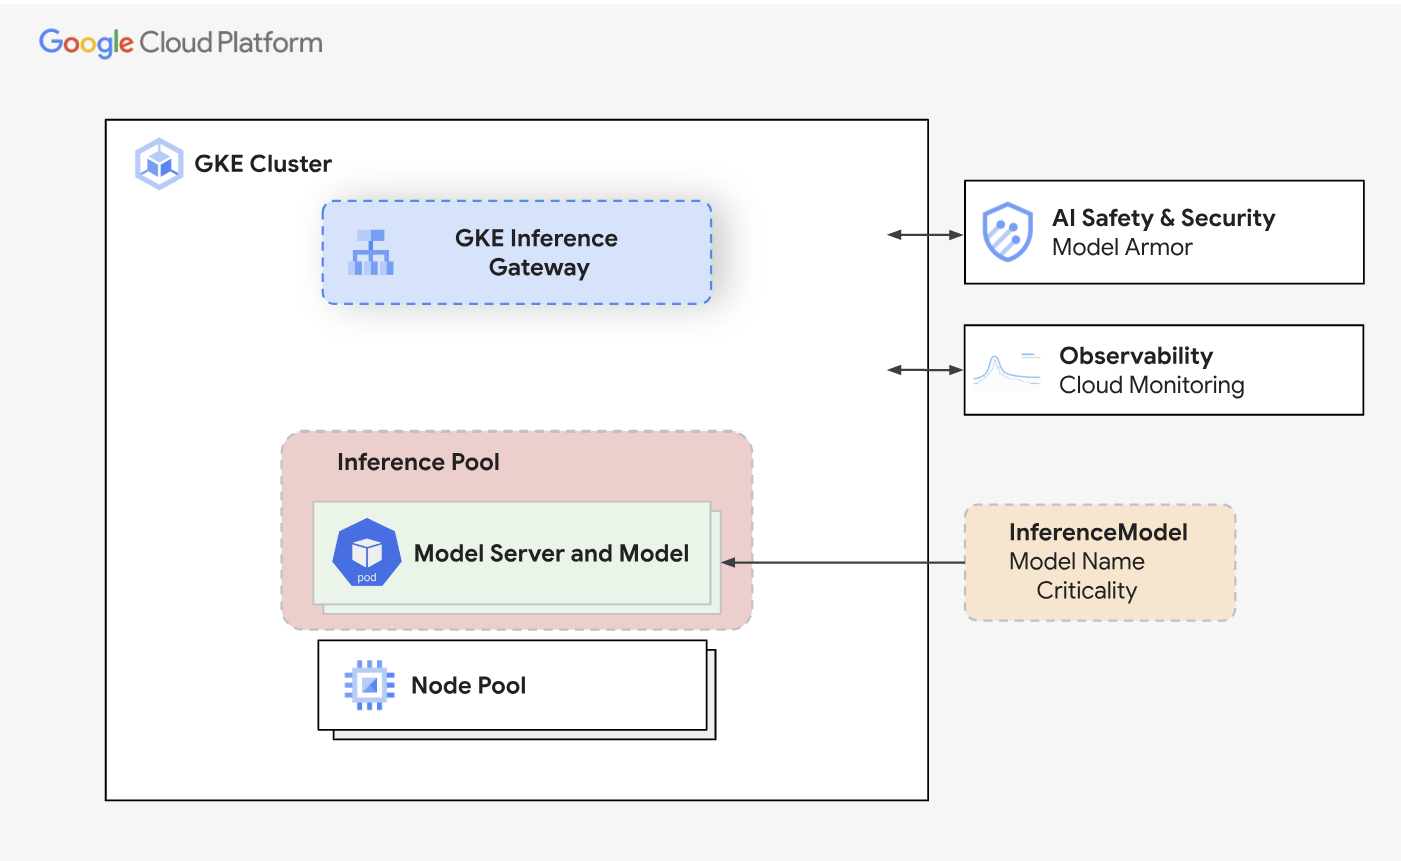
GKE 推理网关及其与 AI 安全、可观测性和模型部署的集成。
GKE 推理网关动手实验
下面我们将指导您完成 GKE 推理网关的基本设置步骤。
第一步:安装 InferencePool 和 InferenceModel CRD
首先,我们需要安装 GKE 推理网关所需的自定义资源定义(CRD)。这些 CRD(InferencePool 和 InferenceModel)是配置推理服务的基础。
运行以下命令进行安装:
kubectl apply -f https://github.com/kubernetes-sigs/gateway-api-inference-extension/releases/download/v0.3.0/manifests.yaml |
第二步:设置指标抓取(Metrics Scrape)的授权
为了能够监控推理网关的性能,需要创建一个服务账号(ServiceAccount)并授予其读取指标的权限。
运行以下 kubectl 命令来创建相应的 RBAC 规则:
kubectl apply -f - <<EOF --- apiVersion: rbac.authorization.k8s.io/v1 kind: ClusterRole metadata: name: inference-gateway-metrics-reader rules: - nonResourceURLs: - /metrics verbs: - get --- apiVersion: v1 kind: ServiceAccount metadata: name: inference-gateway-sa-metrics-reader namespace: default --- apiVersion: rbac.authorization.k8s.io/v1 kind: ClusterRoleBinding metadata: name: inference-gateway-sa-metrics-reader-role-binding namespace: default subjects: - kind: ServiceAccount name: inference-gateway-sa-metrics-reader namespace: default roleRef: kind: ClusterRole name: inference-gateway-metrics-reader apiGroup: rbac.authorization.k8s.io --- apiVersion: v1 kind: Secret metadata: name: inference-gateway-sa-metrics-reader-secret namespace: default annotations: kubernetes.io/service-account.name: inference-gateway-sa-metrics-reader type: kubernetes.io/service-account-token --- apiVersion: rbac.authorization.k8s.io/v1 kind: ClusterRole metadata: name: inference-gateway-sa-metrics-reader-secret-read rules: - resources: - secrets apiGroups: [""] verbs: ["get", "list", "watch"] resourceNames: ["inference-gateway-sa-metrics-reader-secret"] --- apiVersion: rbac.authorization.k8s.io/v1 kind: ClusterRoleBinding metadata: name: gmp-system:collector:inference-gateway-sa-metrics-reader-secret-read namespace: default roleRef: name: inference-gateway-sa-metrics-reader-secret-read kind: ClusterRole apiGroup: rbac.authorization.k8s.io subjects: - name: collector namespace: gmp-system kind: ServiceAccount EOF |
说明:该命令会创建一个名为 inference-gateway-metrics-reader 的 ClusterRole(集群角色)和 ServiceAccount(服务账号),并将其绑定,允许该账号访问 /metrics 端点以收集监控数据。
第三步:创建 Kubernetes Secret 以存储您的 Hugging Face Token
如果您的模型托管在 Hugging Face 的私有仓库中,您需要创建一个 Kubernetes Secret 来安全地存储您的访问令牌(Token)。
执行以下命令。请务必将 <your hf token>
kubectl create secret generic hf-token --from-literal=token=<your hf token> |
第四步:在 GKE 集群上部署 vLLM
接下来,我们将创建一个 Kubernetes Deployment 来运行 vLLM(一个高性能的 LLM 推理和服务框架)。
以下是部署所需的 YAML 配置文件。您可以将其保存为 deployment-vllm.yaml 文件。
# deployment-Vllm.yaml apiVersion: apps/v1 kind: Deployment metadata: name: vllm-llama3-8b-instruct spec: replicas: 3 selector: matchLabels: app: vllm-llama3-8b-instruct template: metadata: labels: app: vllm-llama3-8b-instruct spec: containers: - name: vllm image: "vllm/vllm-openai:latest" imagePullPolicy: Always command: ["python3", "-m", "vllm.entrypoints.openai.api_server"] args: - "--model" - "meta-llama/Llama-3.1-8B-Instruct" - "--tensor-parallel-size" - "1" - "--port" - "8000" - "--enable-lora" - "--max-loras" - "2" - "--max-cpu-loras" - "12" env: - name: PORT value: "8000" - name: HUGGING_FACE_HUB_TOKEN valueFrom: secretKeyRef: name: hf-token key: token - name: VLLM_ALLOW_RUNTIME_LORA_UPDATING value: "true" ports: - containerPort: 8000 name: http protocol: TCP lifecycle: preStop: sleep: seconds: 30 livenessProbe: httpGet: path: /health port: http scheme: HTTP periodSeconds: 1 successThreshold: 1 failureThreshold: 5 timeoutSeconds: 1 readinessProbe: httpGet: path: /health port: http scheme: HTTP periodSeconds: 1 successThreshold: 1 failureThreshold: 1 timeoutSeconds: 1 startupProbe: failureThreshold: 3600 initialDelaySeconds: 2 periodSeconds: 1 httpGet: path: /health port: http scheme: HTTP resources: limits: nvidia.com/gpu: 1 requests: nvidia.com/gpu: 1 volumeMounts: - mountPath: /data name: data - mountPath: /dev/shm name: shm - name: adapters mountPath: "/adapters" initContainers: - name: lora-adapter-syncer tty: true stdin: true image: us-central1-docker.pkg.dev/k8s-staging-images/gateway-api-inference-extension/lora-syncer:main restartPolicy: Always imagePullPolicy: Always env: - name: DYNAMIC_LORA_ROLLOUT_CONFIG value: "/config/configmap.yaml" volumeMounts: - name: config-volume mountPath: /config restartPolicy: Always enableServiceLinks: false terminationGracePeriodSeconds: 130 nodeSelector: cloud.google.com/gke-accelerator: "nvidia-h100-80gb" volumes: - name: data emptyDir: {} - name: shm emptyDir: medium: Memory - name: adapters emptyDir: {} - name: config-volume configMap: name: vllm-llama3-8b-adapters --- apiVersion: v1 kind: ConfigMap metadata: name: vllm-llama3-8b-adapters data: configmap.yaml: | vLLMLoRAConfig: name: vllm-llama3.1-8b-instruct port: 8000 defaultBaseModel: meta-llama/Llama-3.1-8B-Instruct ensureExist: models: - id: food-review source: Kawon/llama3.1-food-finetune_v14_r8 - id: cad-fabricator source: redcathode/fabricator --- kind: HealthCheckPolicy apiVersion: networking.gke.io/v1 metadata: name: health-check-policy namespace: default spec: targetRef: group: "inference.networking.x-k8s.io" kind: InferencePool name: vllm-llama3-8b-instruct default: config: type: HTTP httpHealthCheck: requestPath: /health port: 8000 |
说明:
此配置会创建一个名为 vllm-llama3-8b-instruct 的 Deployment。
它会启动 3 个副本(replicas)。
容器会使用 vllm/vllm-openai:latest 镜像,并加载 meta-llama/Llama-3-1-8B-Instruct 模型。
服务将在容器的 8000 端口上运行。
第五步:创建 Inference Pool
现在我们已经部署了 vLLM 模型服务,下一步是创建一个 InferencePool。这个资源会告诉 GKE 推理网关如何找到并管理我们的 vLLM Pod。
您可以使用 Helm Chart 来方便地创建。
helm install vllm-llama3-8b-instruct \\ --set inferencePool.modelServers.matchLabels.app=vllm-llama3-8b-instruct \\ --set provider.name=gke \\ --version v0.3.0 \\ oci://registry.k8s.io/gateway-api-inference-extension/charts/inferencepool |
第六步:部署 Gateway
现在我们需要创建 Gateway 资源本身。这个资源将为您创建一个负载均衡器,作为所有流量的入口。
您可以将以下内容保存为 gateway.yaml 并应用到您的集群中。
# gateway.yaml apiVersion: gateway.networking.k8s.io/v1 kind: Gateway metadata: name: inference-gateway spec: gatewayClassName: gke-l7-rilb listeners: - protocol: HTTP port: 80 name: http |
说明:
该配置会创建一个名为 inference-gateway 的 Gateway。
它使用了 gke-l7-rilb 这个 gatewayClassName,代表会创建一个区域级的内部七层负载均衡器。
它会在 80 端口上监听 HTTP 流量。
第七步:部署 HTTPRoute
HTTPRoute 资源用于定义详细的流量路由规则,它会告诉上一步创建的 Gateway 如何根据请求的路径、头部等信息将流量转发到不同的后端服务。
# Httproute.yaml apiVersion: gateway.networking.k8s.io/v1 kind: HTTPRoute metadata: name: my-route spec: parentRefs: - name: inference-gateway rules: - matches: - path: type: PathPrefix value: / backendRefs: - name: vllm-llama3-8b-instruct kind: InferencePool group: "inference.networking.x-k8s.io" |
说明:
默认规则:所有的流量(/)都会被转发到一个名为 food-review 的 InferenceModel 资源。这是将流量引导至 AI 模型的关键。
第八步:定义 Inference Model
InferenceModel 是一个自定义资源,它代表了一个逻辑上的 AI 模型,并将其与底层的 InferencePool 关联起来。
# InferenceModel.yaml apiVersion: inference.networking.x-k8s.io/v1alpha2 kind: InferenceModel metadata: name: food-review spec: modelName: food-review criticality: Standard poolRef: name: vllm-llama3-8b-instruct targetModels: - name: food-review weight: 50 --- apiVersion: inference.networking.x-k8s.io/v1alpha2 kind: InferenceModel metadata: name: cad-fabricator spec: modelName: cad-fabricator criticality: Standard poolRef: name: vllm-llama3-8b-instruct targetModels: - name: cad-fabricator weight: 50 --- apiVersion: inference.networking.x-k8s.io/v1alpha2 kind: InferenceModel metadata: name: llama3-base-model spec: modelName: meta-llama/Llama-3.1-8B-Instruct criticality: Critical poolRef: name: vllm-llama3-8b-instruct |
说明:
我们定义了第一个 InferenceModel,名为 food-review。
criticality: Standard 定义了它的服务等级为“标准”。
poolRef 指向了我们之前创建的 vllm-llama3-8b-instruct 推理池。
targetModels 用于进行流量切分,这里将 50% 的权重分配给了名为 food-review 的目标。
我们额外定义了 cad-fabricator 和 llama3-base-model。
请注意 llama3-base-model 的 criticality 被设置为 Critical,这意味着它的请求将拥有更高的优先级。
第九步:测试与验证
在完成所有资源的部署后,现在我们来验证设置是否成功。
获取 Gateway 的 IP 地址。
向模型发送请求
IP=$(kubectl get gateway/inference-gateway -o jsonpath='{.status.addresses[0].value}') PORT=80 # Use 80 for HTTP |
现在,使用我们之前获取的 IP 地址和端口,向部署的模型发送 curl 请求。
调用逻辑模型 food-review 这个请求会通过 HTTPRoute 的默认规则路由到 food-review 这个 InferenceModel。
curl -i -X POST ${IP}:${PORT}/v1/completions -H 'Content-Type: application/json' -H 'Authorization: Bearer $(gcloud auth print-access-token)' -d '{ "model": "food-review", "prompt": "What is the best pizza in the world?", "max_tokens": 2048, "temperature": "0" }' HTTP/1.1 200 OK date: Fri, 18 Apr 2025 03:23:01 GMT server: uvicorn content-type: application/json x-went-into-resp-headers: true via: 1.1 google transfer-encoding: chunked {"choices":[{"finish_reason":"stop","index":0,"logprobs":null,"prompt_logprobs":null,"stop_reason":null,"text":" This is a question that has sparked debate among foodies for centuries. While opinions may vary, here are some of the most popular pizza styles that are worth trying:\\n\\n1. **Neapolitan Pizza**: This classic Italian style is known for its soft crust, fresh toppings, and rich flavors. Try it with San Marzano tomatoes, mozzarella cheese, and basil for an authentic experience.\\n\\n2. **Roman Pizza**: This style is characterized by a crispy crust and a light coating of sauce. It often features toppings like prosciutto, arugula, and burrata cheese.\\n\\n3. **New York-Style Pizza**: Known for its large, thin slices, this style is perfect for those who enjoy a classic American pizza. Try it with pepperoni, mushrooms, and extra cheese.\\n\\n4. **California Pizza**: This style is famous for its non-traditional toppings like pineapple, avocado, and grilled chicken. It's a great option for those looking for something unique.\\n\\n5. **Sicilian Pizza**: This thick-crusted pizza is perfect for those who enjoy a hearty meal. It often features a rich sauce, mozzarella cheese, and various meats or vegetables.\\n\\nRemember, the best pizza is always the one that you enjoy the most, so feel free to experiment with different toppings and styles to find your perfect pie!"}],"created":1744946582,"id":"cmpl-9c05ac6871574fc0bb8b0daab5420e87","model":"food-review","object":"text_completion","usage":{"completion_tokens":270,"prompt_tokens":10,"prompt_tokens_details":null,"total_tokens":280}} |
第十步:配置 vLLM 监控仪表盘
为了观测 vLLM 服务的性能,我们可以创建一个 PodMonitoring 资源,让 Google Cloud Managed Service for Prometheus 来自动抓取指标。
apiVersion: monitoring.googleapis.com/v1 kind: PodMonitoring metadata: name: vllm labels: app.kubernetes.io/name: vllm app.kubernetes.io/part-of: google-cloud-managed-prometheus spec: endpoints: - port:8000 scheme: http interval: 30s path: /metrics selector: matchLabels: app: vllm-llama3-8b-instruct |
说明:
这个配置会指示 Prometheus 每隔 30 秒从所有带有 app: vllm-llama3-8b-instruct 标签的 Pod 的 8000 端口上抓取 /metrics 数据。
抓取到的指标随后可以在 Cloud Monitoring 中用于创建仪表盘和设置告警,就像页面中展示的仪表盘截图一样。

第十一步:配置 HPA(自动扩缩容)
本节将介绍如何配置 HPA,以根据从 vLLM 推理服务收集到的自定义指标来自动伸缩 Pod 数量。
部署自定义指标适配器
首先,您需要部署 Google Cloud 的自定义指标适配器。这个适配器能让 HPA 读取 Cloud Monitoring 中的指标数据。
kubectl apply -f https://raw.githubusercontent.com/GoogleCloudPlatform/k8s-stackdriver/master/custom-metrics-stackdriver-adapter/deploy/production/adapter_new_resource_model.yaml |
说明:
此命令会安装一个组件,它将作为桥梁,把 Cloud Monitoring 的指标暴露给 Kubernetes 的 HPA 控制器。
部署 HPA
接下来,我们创建一个 HorizontalPodAutoscaler 资源。它会监控指定的指标,并在指标超过阈值时自动增加或减少 Pod 的副本数。
apiVersion: autoscaling/v2 kind: HorizontalPodAutoscaler metadata: name: vllm-llama3-8b-instruct namespace: default spec: scaleTargetRef: apiVersion: apps/v1 kind: Deployment name: vllm-llama3-8b-instruct minReplicas: 1 maxReplicas: 5 metrics: - type: External external: metric: name: prometheus.googleapis.com|inference_pool_average_kv_cache_utilization|gauge selector: matchLabels: metric.labels.name: vllm-llama3-8b-instruct resource.labels.cluster: flius-inference-gw-new resource.labels.namespace: default target: type: AverageValue averageValue: 0.001 |
第十二步:压力测试
https://github.com/AI-Hypercomputer/inference-benchmark/blob/main/deploy/deployment.yaml
我们采用下面的 deployment 来进行一些压力和 benchmark 测试以获取指标数据。
apiVersion: apps/v1 kind: Deployment metadata: name: latency-profile-generator namespace: default labels: name: latency-profile-generator spec: selector: matchLabels: name: latency-profile-generator template: metadata: labels: name: latency-profile-generator spec: serviceAccountName: default containers: - name: latency-profile-generator image: us-central1-docker.pkg.dev/gpu-launchpad-playground/ai-benchmark/inference-benchmark:latest command: ["bash", "-c", "./latency_throughput_curve.sh"] env: - name: MODELS value: "meta-llama/Llama-3.1-8B-Instruct" - name: TOKENIZER value: "meta-llama/Llama-3.1-8B-Instruct" - name: IP value: 10.128.0.93 - name: PORT value: "80" - name: BACKEND value: vllm # other options are tgi, tensorrt_llm_triton, jetstream to benchmark those model servers - name: PROMPT_DATASET value: "sharegpt" - name: INPUT_LENGTH value: "1024" - name: OUTPUT_LENGTH value: "1024" - name: REQUEST_RATES value: "10,20,40,80" - name: BENCHMARK_TIME_SECONDS value: "300" - name: FILE_PREFIX value: "benchmark" - name: OUTPUT_BUCKET # adding a GCS bucket will persist the benchmarking report in GCS. value: "" - name: OUTPUT_BUCKET_FILEPATH value: "" - name: SCRAPE_SERVER_METRICS value: "false" - name: SAVE_AGGREGATED_RESULT value: "true" - name: STREAM_REQUEST value: "false" - name: HF_TOKEN valueFrom: secretKeyRef: name: hf-token key: token |
第十三步:测试数据 Metrics
下面展示了传统的负载均衡器和 GKE 推理网关的 kv cache 利用率。
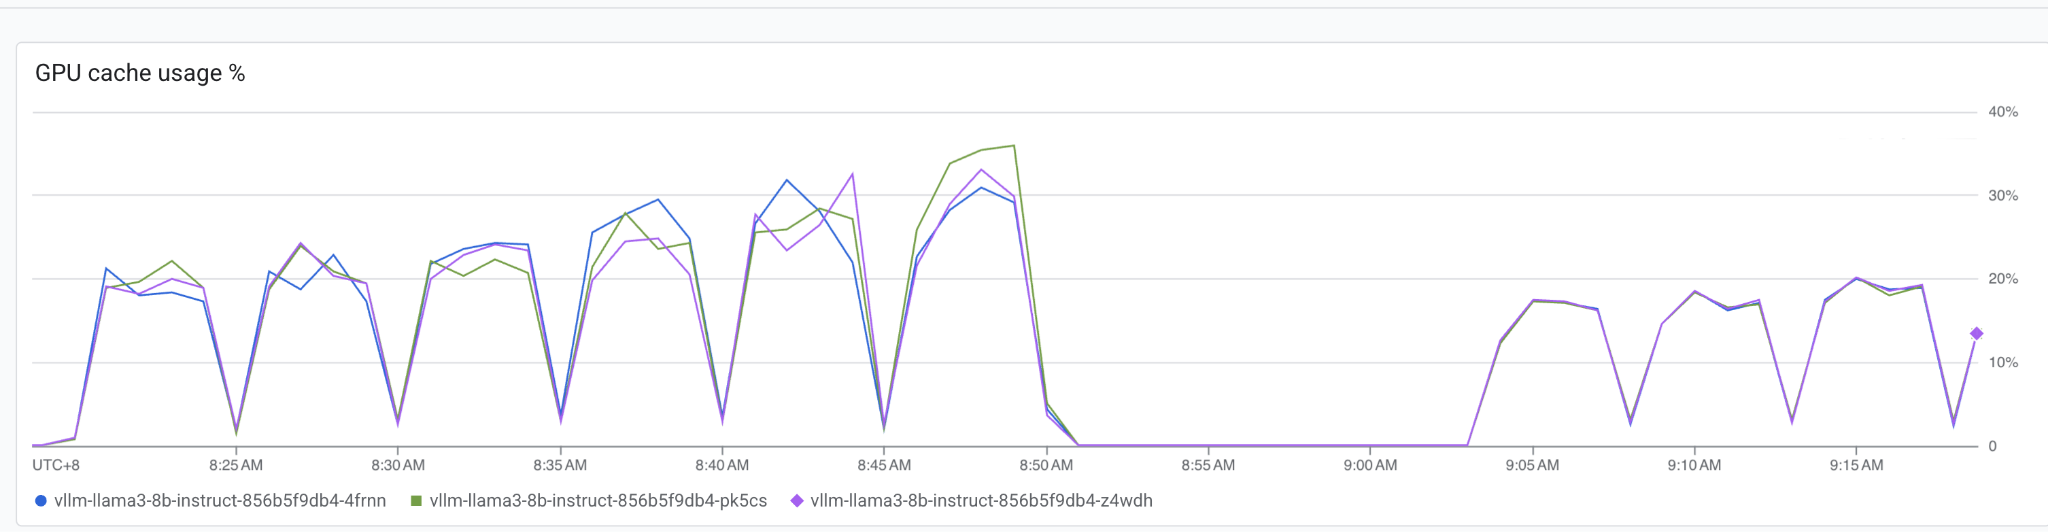

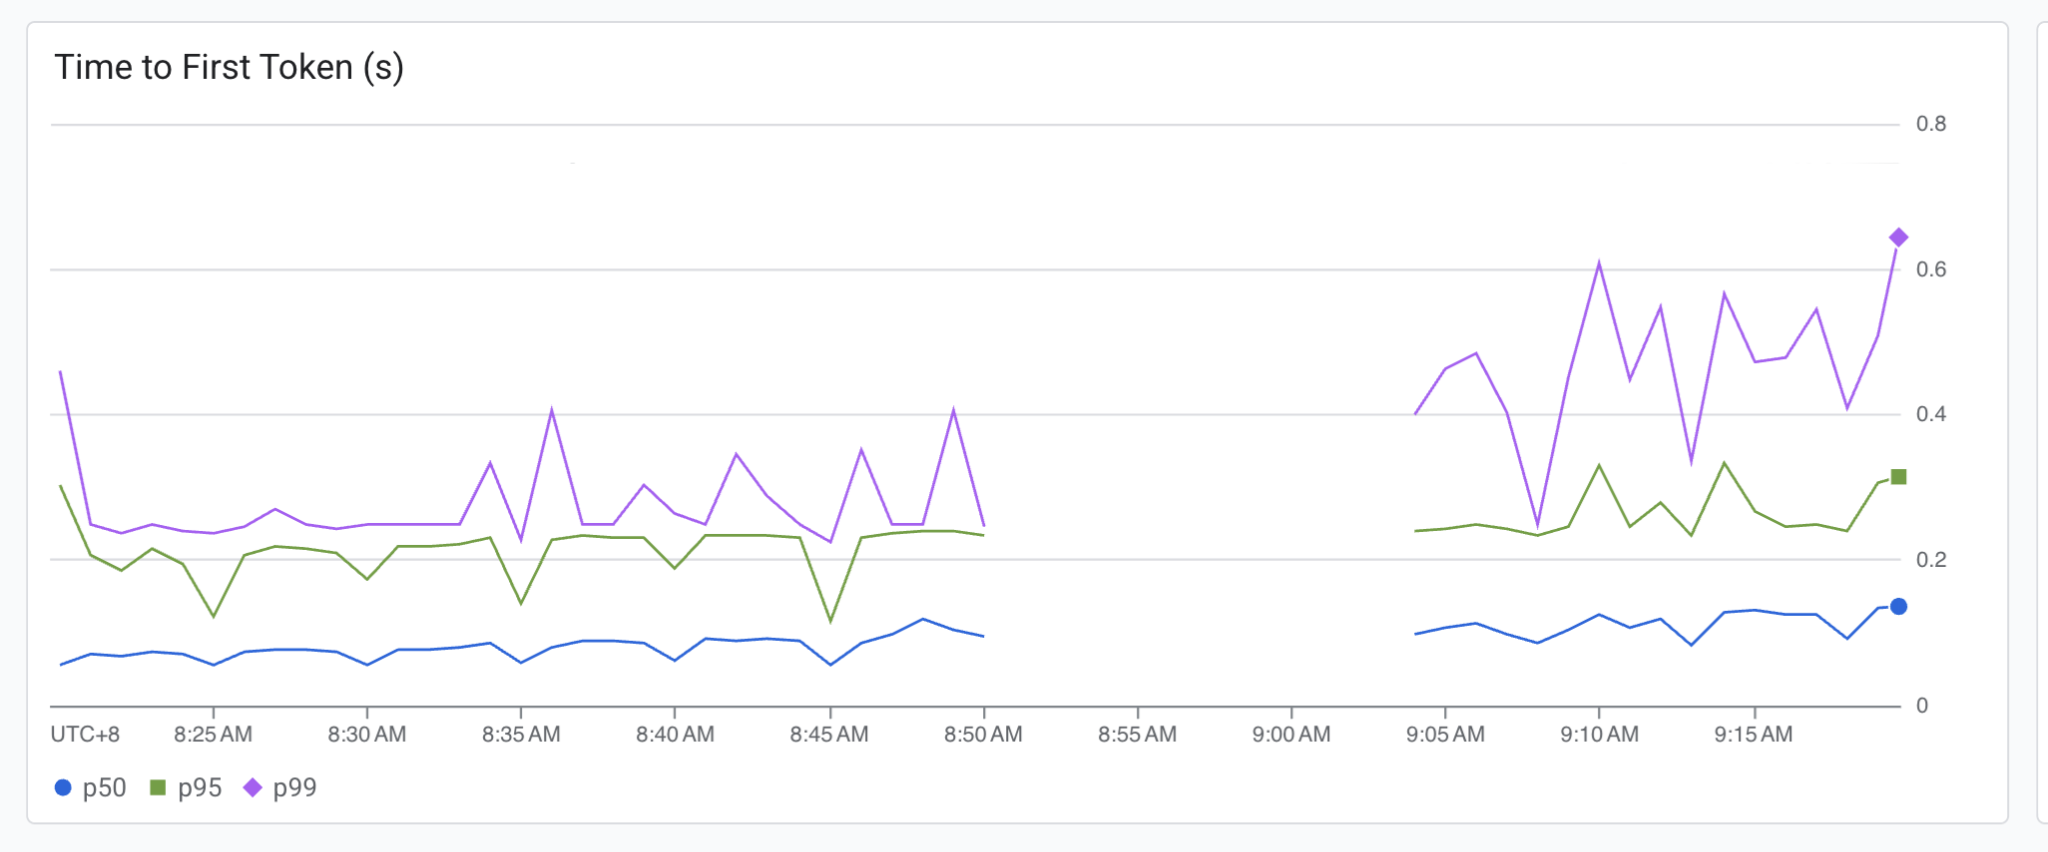
说明:
左侧的部分是传统负载均衡器的数据,右侧是 GKE 推理网关的数据。
从图中可以看出,传统网关将流量转发到后端副本时没有按照实际 KV Cache 的使用率进行转发,而是采取了 round-robin,这样造成了 KV Cache 使用的不均衡。
而 GKE 推理网关可以感知到后端 KV Cache 利用率,每个后端副本都几乎得到了相同的流量,充分利用 GPU 的资源。
另外,可以看见由于 KV Cache 利用率的改善,E2E 的请求延迟也得到了大幅度的降低,而且波动也少了很多;Time to First Token(产生第一个 Token 的延迟)由于还没有 KV Cache,因此变化不大。
总结:
通过这个端到端的教程,我们了解了在 GKE 上部署和管理生产级 AI 推理服务的宝贵实战经验,并深入理解了 GKE 推理网关的核心概念。我们还介绍了如何实现基于模型内容的智能路由,并通过监控与自动伸缩等高级功能,最大限度地提升 GPU 等昂贵资源的利用率,最终构建一个兼具成本效益与稳定性的现代化 AI 应用平台。
总而言之,GKE 推理网关不仅仅是一个流量入口,更是一个为 AI 工作负载量身打造的、具备智能与洞察力的“调度指挥官”,能帮助您更经济、更稳定、更高效地运行您的 AI 应用。
文章信息
相关推荐
精选内容

关注【谷歌云服务】
微信公众号
微信公众号
微信咨询:
周一至周五 早上 9 点到晚上 6 点
联系我们