首页 > 资源 > 文章详情
如何在 GKE 中利用占位 Pod 处理突发流量
使用场景
我们在使用 Kubernetes 来处理突发流量的 Workload 时,需要在短时间来处理大量激增的流量,但由于后台的 Node 需要临时扩展才能进行 Pod 的横向扩展,导致最终用户访问体验不佳,时延增加甚至无法访问服务。
针对这一问题,实际上有很多解决办法,但这些办法核心的逻辑基本都是通过预测资源使用量并提供 buffer 的资源,提前进行扩容,以便在流量突增时,能够平滑地应对。
下面我们来介绍其中的一种,使用 Pod 的 Priority Class,通过运行占位符 Pod,提前扩容所需的节点资源,来应对突发流量的挑战。
关于 Pod 的 PriorityClass
PriorityClass:优先级
用来控制 Pod 调度时的优先级,Value 越大优先级越高,可以设置成负数,表示极低的优先级。
High priority class
apiVersion: scheduling.k8s.io/v1 kind: PriorityClass metadata: name: high-priority value: 1000000 globalDefault: false description: "This priority class should be used for XYZ service pods only." |
Low priority class
apiVersion: scheduling.k8s.io/v1 kind: PriorityClass metadata: name: low-priority value: 1000 globalDefault: false description: "Low Priority" |
Deployment
apiVersion: apps/v1 kind: Deployment metadata: labels: app: nginx-high name: nginx-high spec: selector: matchLabels: app: nginx-high template: metadata: labels: app: nginx-high spec: containers: - image: nginx name: nginx resources: requests: cpu: "250m" limits: cpu: "500m" priorityClassName: high-priority |
一般来说,当 Pod 被调度的时候,越高优先级的 Pod 放在调度队列的越前面,默认情况下高优先级的 Pod 可以抢占低优先级的 Pod 资源,即使低优先级的 Pod 正在 Running,也会被 Terminate,调度器把资源给高优先级的 Pod。当没有资源时会触发扩容,不能扩容则 Pod 会 Pending。
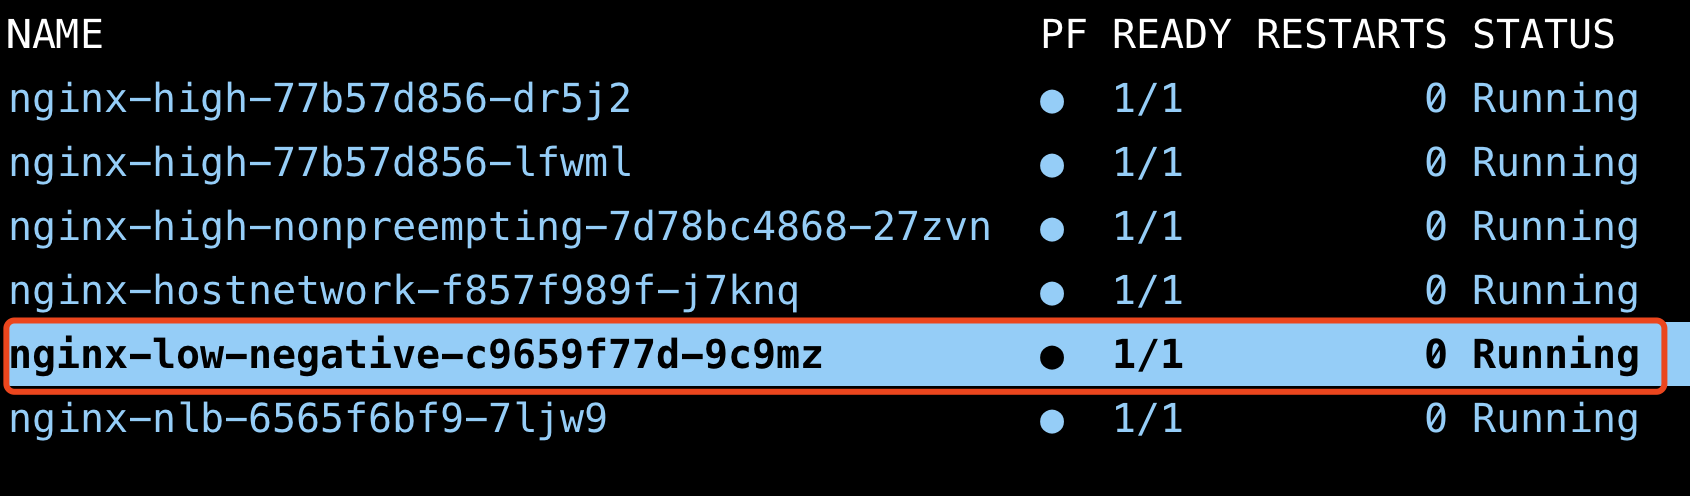
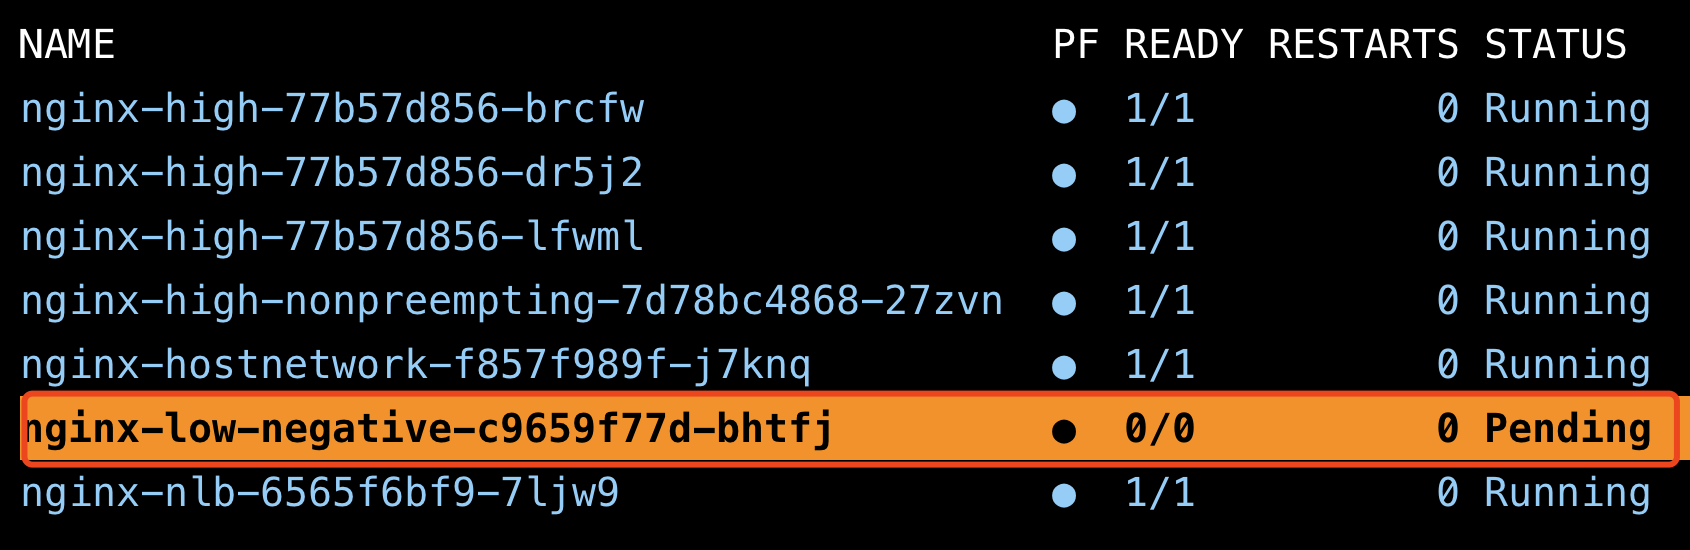
如下图,最初 Deployment nginx-high 有 2 个副本,当我们把 nginx-high 扩容到 3 个副本时,k8s 调度器会 Terminate low priority 的 Deployment nginx-low 的 Pod,从而抢占资源。最终能启动 nginx-high 的第 3 个副本。
PreemptionPolicy:抢占策略
你还也可以设置抢占策略来设置是否启用抢占行为。当 PreemptionPolicy 设置成 Never,则不会抢占。此时只是在调度的时候看优先级,即当 Deployment 进行调度时,优先考虑调度 High priority 的,而不是 Terminate low priority 的来抢占资源。换句话说,即使有一个 High priority 的 Pod 在扩容时要被调度,也不会抢占并 Terminate 现有 Running 的低优先级 Pod。
apiVersion: scheduling.k8s.io/v1 kind: PriorityClass metadata: name: high-priority-nonpreempting value: 1000000 preemptionPolicy: Never globalDefault: false description: "This priority class will not cause other pods to be preempted." |
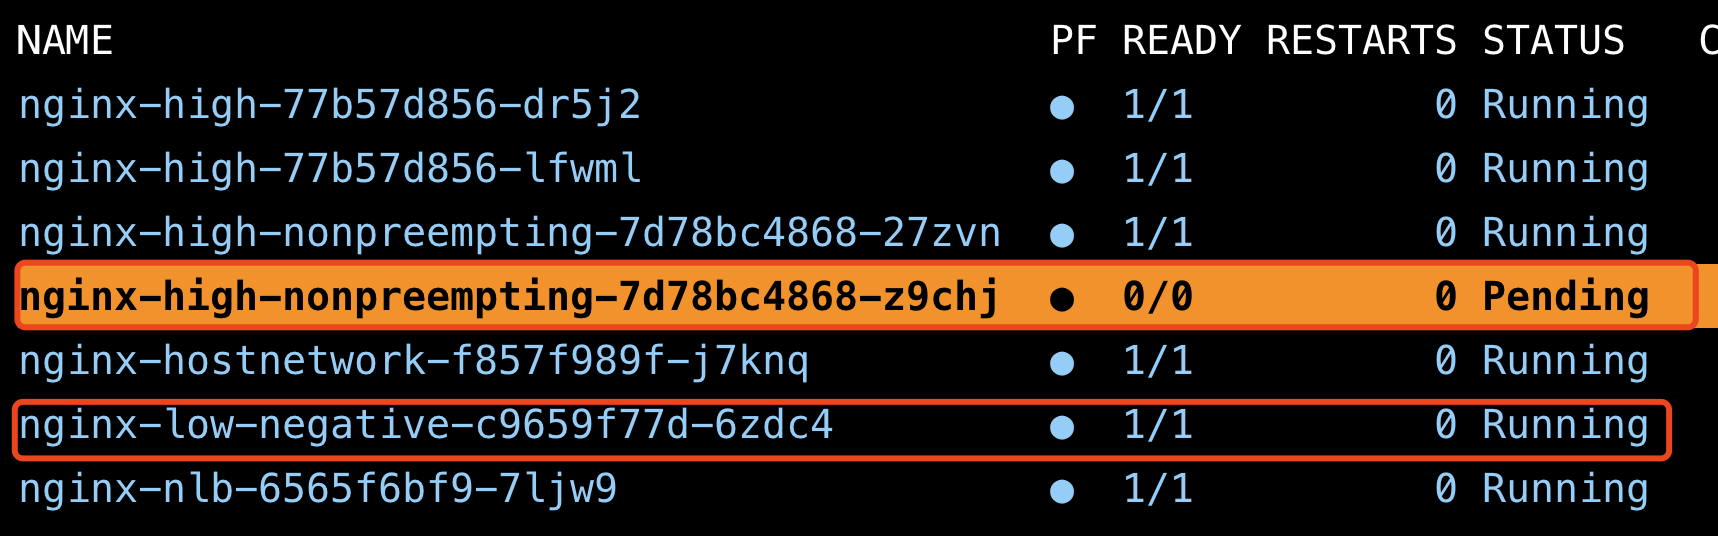
如下图,即使是 High priority 的 Pod,但由于设置了 PreemptionPolicy: Never,Low priority 的 Pod 并没有被 Terminate。
具体步骤
建立 GKE 集群
gcloud beta container --project "flius-vpc-2" clusters create "test-priorityclass" --zone "us-central1-c" --num-nodes "1" --enable-ip-alias --enable-autoscaling --min-nodes "0" --max-nodes "3" --autoscaling-profile optimize-utilization --node-locations "us-central1-c" |
注意我们在创建 GKE 集群时,设置了自动扩容的规则和扩容的 Profile。
--enable-autoscaling --min-nodes "0" --max-nodes "3" --autoscaling-profile optimize-utilization |
部署 Workload
先部署 Priority class。
# high priority class apiVersion: scheduling.k8s.io/v1 kind: PriorityClass metadata: name: high-priority value: 1000000 globalDefault: false description: "This priority class should be used for XYZ service pods only."
# low priority class apiVersion: scheduling.k8s.io/v1 kind: PriorityClass metadata: name: low-priority value: 1000 globalDefault: false description: "." |
接下来部署 Deployment。
#deployment-high.yaml apiVersion: apps/v1 kind: Deployment metadata: labels: app: nginx-high name: nginx-high spec: selector: matchLabels: app: nginx-high template: metadata: labels: app: nginx-high spec: containers: - image: nginx name: nginx resources: requests: cpu: "250m" limits: cpu: "500m" priorityClassName: high-priority
#deployment-low.yaml apiVersion: apps/v1 kind: Deployment metadata: labels: app: nginx-low name: nginx-low spec: selector: matchLabels: app: nginx-low template: metadata: labels: app: nginx-low spec: containers: - image: nginx name: nginx resources: requests: cpu: "250m" limits: cpu: "500m" priorityClassName: low-priority |
检查 Pod 的状态。
kubectl get po -owide NAME READY STATUS RESTARTS AGE IP NODE NOMINATED NODE READINESS GATES nginx-high-77b57d856-vrcv4 1/1 Running 0 6m15s 10.64.0.10 gke-test-priorityclass-default-pool-a3e3efd5-ndgl <none> <none> nginx-low-5d64fcf784-h4k49 1/1 Running 0 6m3s 10.64.1.2 gke-test-priorityclass-default-pool-a3e3efd5-t96z <none> <none> |
检查 Node 的状态。
kubectl get nodes NAME STATUS ROLES AGE VERSION gke-test-priorityclass-default-pool-a3e3efd5-ndgl Ready <none> 8m34s v1.24.10-gke.2300 gke-test-priorityclass-default-pool-a3e3efd5-t96z Ready <none> 3m36s v1.24.10-gke.2300 |
开始扩容 High priority 的 Deployment。
kubectl scale deploy/nginx-high --replicas=2 deployment.apps/nginx-high scaled |
可以看见 Low priority 的 Pod 被 Terminate 掉,High priority 的 Pod 抢占了 Node gke-test-priorityclass-default-pool-a3e3efd5-t96z。
kubectl get po -owide NAME READY STATUS RESTARTS AGE IP NODE NOMINATED NODE READINESS GATES nginx-high-77b57d856-nnhm9 1/1 Running 0 17s 10.64.1.5 gke-test-priorityclass-default-pool-a3e3efd5-t96z <none> <none> nginx-high-77b57d856-vrcv4 1/1 Running 0 7m39s 10.64.0.10 gke-test-priorityclass-default-pool-a3e3efd5-ndgl <none> <none> nginx-low-5d64fcf784-crdh9 0/1 Pending 0 16s <none> <none> <none> <none> |
接下来 GKE Cluster Autoscaler 会扩容一个新的 Node。
kubectl get nodes NAME STATUS ROLES AGE VERSION gke-test-priorityclass-default-pool-a3e3efd5-f6q8 Ready <none> 4s v1.24.10-gke.2300 gke-test-priorityclass-default-pool-a3e3efd5-ndgl Ready <none> 12m v1.24.10-gke.2300 gke-test-priorityclass-default-pool-a3e3efd5-t96z Ready <none> 7m14s v1.24.10-gke.2300 |
最终,Low priority 的 Pod 会被调度到新的 Node 上。
kubectl get po -owide NAME READY STATUS RESTARTS AGE IP NODE NOMINATED NODE READINESS GATES nginx-high-77b57d856-nnhm9 1/1 Running 0 78s 10.64.1.5 gke-test-priorityclass-default-pool-a3e3efd5-t96z <none> <none> nginx-high-77b57d856-vrcv4 1/1 Running 0 8m40s 10.64.0.10 gke-test-priorityclass-default-pool-a3e3efd5-ndgl <none> <none> nginx-low-5d64fcf784-crdh9 1/1 Running 0 77s 10.64.2.2 gke-test-priorityclass-default-pool-a3e3efd5-f6q8 <none> <none> |
结论
这样就可以通过低优先级的 Pod 来占位,提前进行扩容准备,一旦有突发流量进入,则抢占低优先级的占位 Pod 的资源,从而快速启动业务高优先级的 Pod,达到快速服务突发流量的目的。
参考资料
https://kubernetes.io/docs/concepts/scheduling-eviction/pod-priority-preemption/
文章信息
相关推荐
精选内容

关注【谷歌云服务】
微信公众号
微信公众号
微信咨询:
周一至周五 早上 9 点到晚上 6 点
联系我们