谷歌云 Cloud CDN 最近新添了一个配置,可以根据客户端请求的 HTTP Header 来判断是否要绕过缓存直接回源。这个功能有利于在不改变缓存规则的情况下让客户端尽快获取更新的内容,比如应用配置,用户头像,首页图片等等。而谷歌云的 CDN 边缘节点并不会用针对这种请求的响应来更新边缘缓存——更新缓存还是需要使用 Cache Invalidate API 接口。下面步骤介绍如何配置和使用这个功能,并且验证其是否会刷新边缘缓存。
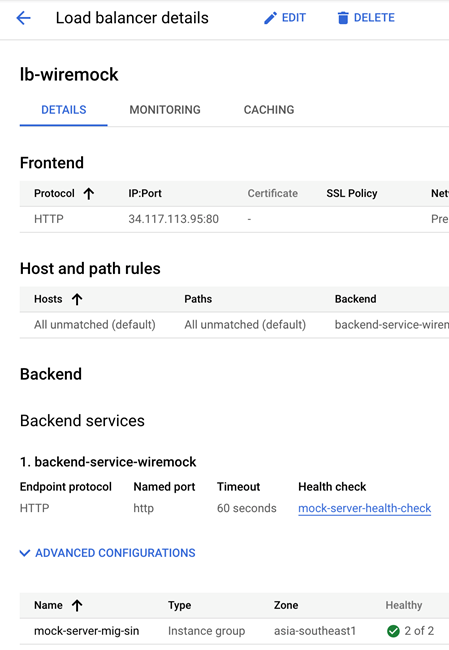
首先创建一个 HTTP Load Balancer,并配置其后端为一个虚机实例组,虚机上按照 Nginx。配置如下。
在 Nginx 的 html 目录下创建一个文本文件,其内容为“This is some text v1”。
$ cat <<EOF | sudo tee /var/www/html/file.txt
This is some text v1
EOF |
通过 GCLB 的地址来访问这个文件,确认访问成功。
$ curl -v http://35.227.251.193/file.txt
* Trying 35.227.251.193:80...
* Connected to 35.227.251.193 (35.227.251.193) port 80 (#0)
> GET /file.txt HTTP/1.1
> Host: 35.227.251.193
> User-Agent: curl/7.77.0
> Accept: */*
>
* Mark bundle as not supporting multiuse
< HTTP/1.1 200 OK
< server: envoy
< date: Thu, 25 Nov 2021 11:22:29 GMT
< content-type: text/plain
< Content-Length: 21
< last-modified: Thu, 25 Nov 2021 10:28:04 GMT
< etag: "619f6534-15"
< accept-ranges: bytes
< via: 1.1 google
<
This is some text v1
* Connection #0 to host 35.227.251.193 left intact |
修改负载均衡配置,打开 CDN 功能,并强制缓存所有文件。

此时再通过负载均衡地址访问几次文件,可以看到 Age 头,说明缓存已经创建并且可以命中。
$ curl -v http://35.227.251.193/file.txt
* Trying 35.227.251.193:80...
* Connected to 35.227.251.193 (35.227.251.193) port 80 (#0)
> GET /file.txt HTTP/1.1
> Host: 35.227.251.193
> User-Agent: curl/7.77.0
> Accept: */*
>
* Mark bundle as not supporting multiuse
< HTTP/1.1 200 OK
< server: envoy
< Date: Thu, 25 Nov 2021 11:22:29 GMT
< Content-Type: text/plain
< Content-Length: 21
< Last-Modified: Thu, 25 Nov 2021 10:28:04 GMT
< ETag: "619f6534-15"
< accept-ranges: bytes
< via: 1.1 google
< Age: 2
< Cache-Control: public,max-age=3600
<
This is some text v1
* Connection #0 to host 35.227.251.193 left intact |
现在改变 Nginx 服务器上文件内容。
cat <<EOF | sudo tee /var/www/html/file.txt
This is some text v2
EOF |
再次通过负载均衡访问该文件,可以看到虽然源站内容更新,但是因为缓存时效为一小时,客户端请求得到的文件仍然是之前的版本,即过期内容。
$ curl -v http://35.227.251.193/file.txt
* Trying 35.227.251.193:80...
* Connected to 35.227.251.193 (35.227.251.193) port 80 (#0)
> GET /file.txt HTTP/1.1
> Host: 35.227.251.193
> User-Agent: curl/7.77.0
> Accept: */*
>
* Mark bundle as not supporting multiuse
< HTTP/1.1 200 OK
< server: envoy
< Date: Thu, 25 Nov 2021 11:22:29 GMT
< Content-Type: text/plain
< Content-Length: 21
< Last-Modified: Thu, 25 Nov 2021 10:28:04 GMT
< ETag: "619f6534-15"
< accept-ranges: bytes
< via: 1.1 google
< Age: 137
< Cache-Control: public,max-age=3600
<
This is some text v1
* Connection #0 to host 35.227.251.193 left intact |
现在打开绕过 CDN 缓存的配置。首先到上述 Cloud CDN 实例的配置详情页,打开后端配置,在最下方点击展开高级功能配置。

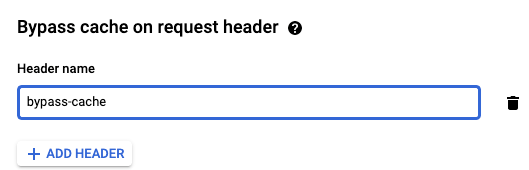
这时可以看到绕过缓存的配置。点击添加 Header。

在输入框里输入要检测的请求 Header 名称,比如 bypass-cache。
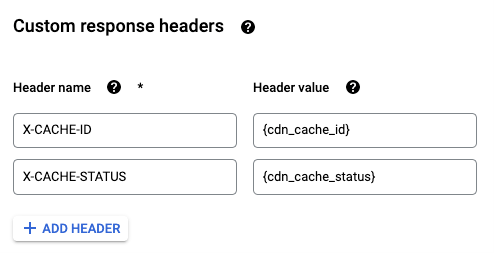
为了方便后面客户端测试验证是否绕过或更新特定缓存节点上的缓存,可以添加两个自定义响应头,使用预设的 cdn_cache_id 变量来添加显示缓存节点序号,用预设的 cdn_cache_status 变量来添加显示缓存命中结果。
配置完后,点击保存并等待10分钟左右让配置完成下发到边缘。此时再测试请求文件,如果不带 bypass-cache 头,仍然可以命中缓存。
$ curl -v http://35.227.251.193/file.txt
* Trying 35.227.251.193:80...
* Connected to 35.227.251.193 (35.227.251.193) port 80 (#0)
> GET /file.txt HTTP/1.1
> Host: 35.227.251.193
> User-Agent: curl/7.77.0
> Accept: */*
>
* Mark bundle as not supporting multiuse
< HTTP/1.1 200 OK
< server: envoy
< Date: Thu, 25 Nov 2021 11:22:29 GMT
< Content-Type: text/plain
< Content-Length: 21
< Last-Modified: Thu, 25 Nov 2021 10:28:04 GMT
< ETag: "619f6534-15"
< accept-ranges: bytes
< via: 1.1 google
< Age: 1887
< Cache-Control: public,max-age=3600
< X-CACHE-ID: HKG-4ee15f8e
< X-CACHE-STATUS: hit
<
This is some text v1
* Connection #0 to host 35.227.251.193 left intact |
而如果带了 bypass-cache 缓存头再请求,可以看到响应是更新后的内容,而且缓存命中结果是不使用缓存。
$ curl -H "bypass-cache:1" -v http://35.227.251.193/file.txt
* Trying 35.227.251.193:80...
* Connected to 35.227.251.193 (35.227.251.193) port 80 (#0)
> GET /file.txt HTTP/1.1
> Host: 35.227.251.193
> User-Agent: curl/7.77.0
> Accept: */*
> bypass-cache:1
>
* Mark bundle as not supporting multiuse
< HTTP/1.1 200 OK
< server: envoy
< date: Thu, 25 Nov 2021 11:56:49 GMT
< content-type: text/plain
< Content-Length: 21
< last-modified: Thu, 25 Nov 2021 11:24:21 GMT
< etag: "619f7265-15"
< accept-ranges: bytes
< via: 1.1 google
< X-CACHE-ID: HKG-4ee15f8e
< X-CACHE-STATUS: uncacheable
<
This is some text v2
* Connection #0 to host 35.227.251.193 left intact |
而如果去掉 bypass-cache 头,再访问缓存中的文件,可以看到缓存内容没有变化更新,还是老的内容。说明使用绕过缓存回源请求,并不会更新缓存内容。
$ curl -v http://35.227.251.193/file.txt
* Trying 35.227.251.193:80...
* Connected to 35.227.251.193 (35.227.251.193) port 80 (#0)
> GET /file.txt HTTP/1.1
> Host: 35.227.251.193
> User-Agent: curl/7.77.0
> Accept: */*
>
* Mark bundle as not supporting multiuse
< HTTP/1.1 200 OK
< server: envoy
< Date: Thu, 25 Nov 2021 11:22:29 GMT
< Content-Type: text/plain
< Content-Length: 21
< Last-Modified: Thu, 25 Nov 2021 10:28:04 GMT
< ETag: "619f6534-15"
< accept-ranges: bytes
< via: 1.1 google
< Age: 2087
< Cache-Control: public,max-age=3600
< X-CACHE-ID: HKG-4ee15f8e
< X-CACHE-STATUS: hit
<
This is some text v1
* Connection #0 to host 35.227.251.193 left intact |
注意,在上述 CURL 测试过程中,要注意选择 X-CACHE-ID 中缓存序号相同的请求来对比,因为不同缓存节点的内容是分别独立更新的。