首页 > 资源 > 文章详情
云原生之多云管理:精准控制 GKE 集群出口流量
目录
3.创建一个 internal TCP/UDP load balancing
6.配置 internal tcp load balancing 的 backend
背景和需求
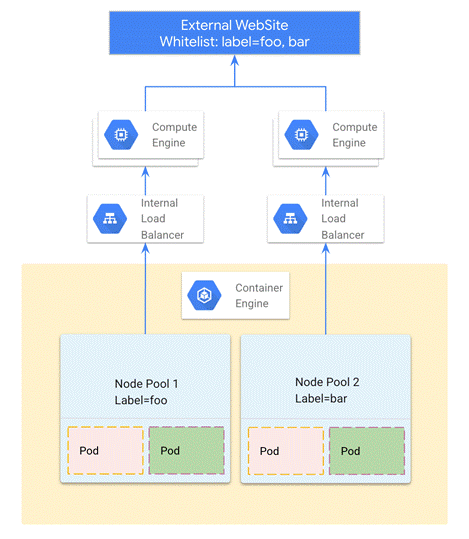
简单解释一下这个需求:主要的使用场景有两种,第一个使用场景是 GKE 不同的 nodepool 出公网走不同的nat或者防火墙;第二个使用场景是某些虚拟机资源出公网需要走特定的防火墙,这种场景中可能是 VPC peering 也可能是同一 VPC;第三种场景就是出口流量过企业防火墙做网络安全审计后,被访问端应用做防火墙白名单。此方案都适用。
前提条件
在进行实验之前,请确保以下的环境和设置都已经准备好。这里我们使用 gcloud 命令行进行配置,当然你也可以选择使用在 UI 页面上操作和配置。
1. 创建跳板机
2. 创建 GKE 私有集群并设置私有集群 Master 对跳板机授权网络配置
3. VPC 防火墙配置
解决方案 #1
我们先来看一下总体的架构,此方案是通过需要出公网走防火墙或者 nat 的资源打好网络标签,有这部分标签的资源出公网流量经过指定的 nat 或者是防火墙。GKE node 或者普通虚拟机和防火墙之间可以同一 VPC,也可以是跨 VPC。带特定标签的资源的下一跳都是特定的 internal tcp/udp load balancing,load balancing 上的 instance group 就是 NAT 或者防火墙,保证流量出的同时,也保证了 NAT 或者防火墙的高可用。当然也可以直接不经过 internal load balancing 直接指向防火墙虚拟机(并不推荐这样做)。以下是具体的部署步骤。
1.创建 GKE 私有集群
可以参考前面的创建步骤
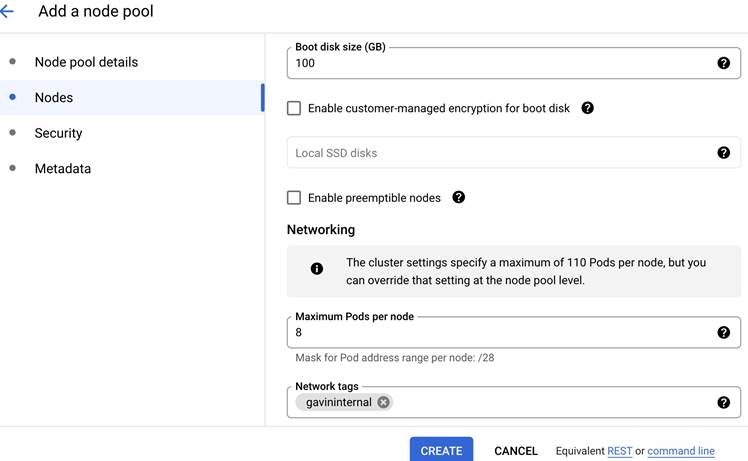
2.创建 nodepool
创建一个新的 nodepool 并带特定的 networking tag
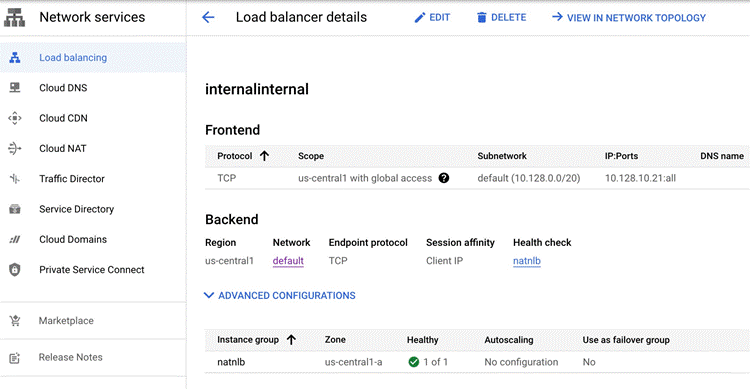
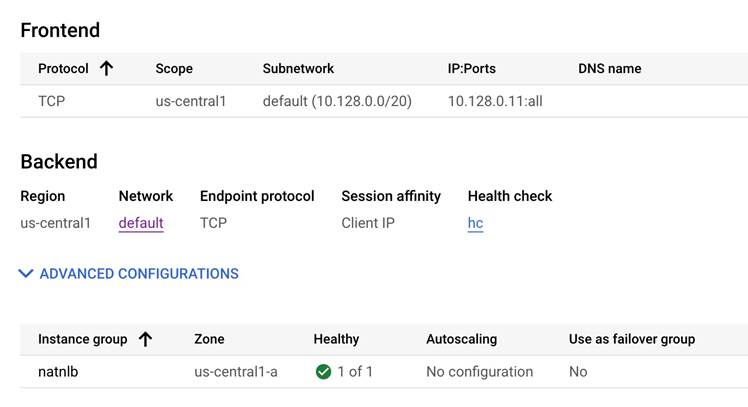
3. 创建一个 internal TCP/UDP load balancing
要保证放开 all ports,基于防火墙有 session 的特点,同时建议配置 session affanity client ip 或者根据需求以保证 session。
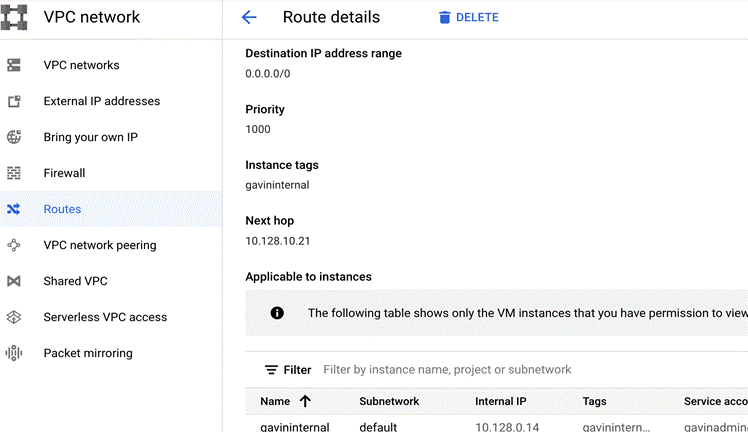
4. 配置 internal load balancing
将 internal tcp/udp load balancing 作为特定标签的 node pool 或者特定 VM 的默认路由
5.创建 NAT VM
注:本文只创建了 NAT 实例,请先把相应网段的 cloudnat 删掉,不然默认会走 cloudnat。进入虚拟机后通过 iptable 配置 SNAT,本文基于 centos。这里也可以是创建防火墙,比如企业做网络安全审计等场景。
1)安装 iptables
2)配置相关 nodepool 或者虚拟机的 SNAT
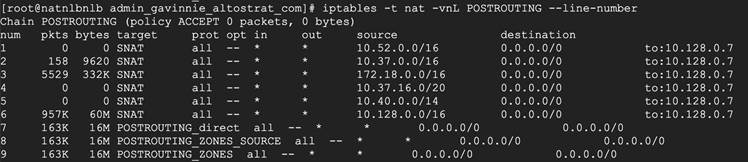
这里的 10.128.0.0/16 是 GKE 的 node 网段,或者是 GKE 的 pod 的所在网段。(也可以是其他想做 snat 的虚拟机或者容器的网段。10.128.0.7 是这个 NAT VM 的 IP。
可以配置多条,命令行相同。配置后查看状态
6.配置 internal tcp load balancing 的 backend
将 NAT VM 放到 internal TCP/UDP load balancing 的 instance group 里,最终的VM数量根据实际需求。Session affinity 根据实际场景进行设置,我这里用的是 Client IP。
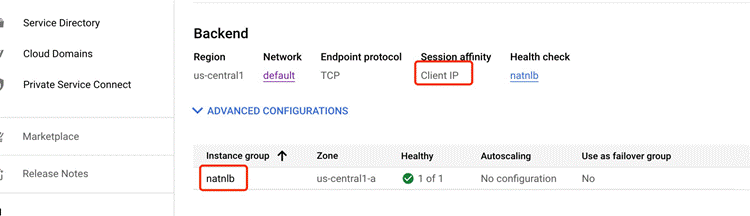
注意:这个 instance group 里的虚拟机要打开 ip forwarding。

7. 验证
首先,部署 pod 并使用 nodeSelector 指定其部署的 nodepool
在带有 network tag 的 nodepool 的 node(或者pod)上验证出公网效果。并确认路径是否走到 internal tcp/udp LB 为下一跳。
参考防火墙设置:
注意:将内部 TCP/UDP 负载均衡器用作下一个跃点您可以将内部 TCP/UDP 负载均衡器用作数据包沿其通往最终目的地的路径转发到的下一个网关。为此,您需要将该负载均衡器设置为自定义静态路由中的下一个跃点。无论协议(TCP、UDP 或 ICMP)如何,部署为自定义路由中下一个跃点的内部 TCP/UDP 负载均衡器都会处理所有流量)。
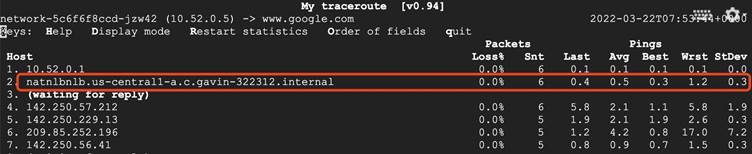
GKE node 验证连通性,验证目的网站: www.google.com
注:本次验证的 node ip:10.37.0.25,pod ip:10.52.0.5

GKE node 验证流量走的是 internal tcp/udp LB,验证目的网站: www.google.com

GKE pod 验证连通性

GKE pod 验证流量走的是 internal tcp/udp LB
解决方案 #2
另外一种场景就是所有 VPC 都需要出公网,都要流经特定的第三方防火墙,部分企业用户会有这样的需求。中间 VPC 要和两边的 VPC 进行 VPC peering 配置,再进行路由的 import 和 export 理由操作。两边的 VPC 走静态对等互联路由。
注:这个场景下两边的 VPC 要删除默认路由走默认互联网网关的路由,以便集中走中间 VPC 网络安全审计。
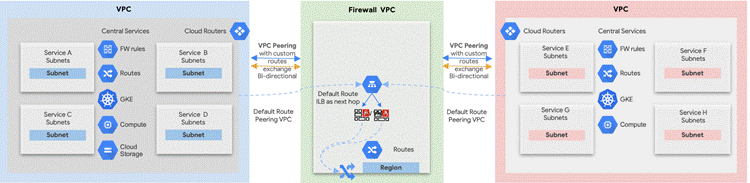
架构说明:
图中有三个 VPC,两边的是业务 VPC,中间是统一的出口防火墙 VPC。当企业客户做网络安全审计时,所有业务 VPC 统一通过这个防火墙 VPC 出公网。那么业务 VPC 的特定资源,比如 gke node pool 等,需要打好特定的网络标签,走标签的默认路由。
1.创建 Internal Load Balancing
在中间带防火墙的 VPC 创建 internal TCP/UDP load balancing
2.创建路由
中间 VPC 需要和两边的 VPC 建立 VPC peering,业务 VPC 出公网流量都需要经过中间 VPC 的第三方防火墙。注意这一条路由不要带 TAG。
3. 配置路由
跨 VPC 情况下进行 VPC PEERING 和路由的 import 和 export。
1)跨 VPC 的情况下,需要 peering,并且需要 import/export 路由。
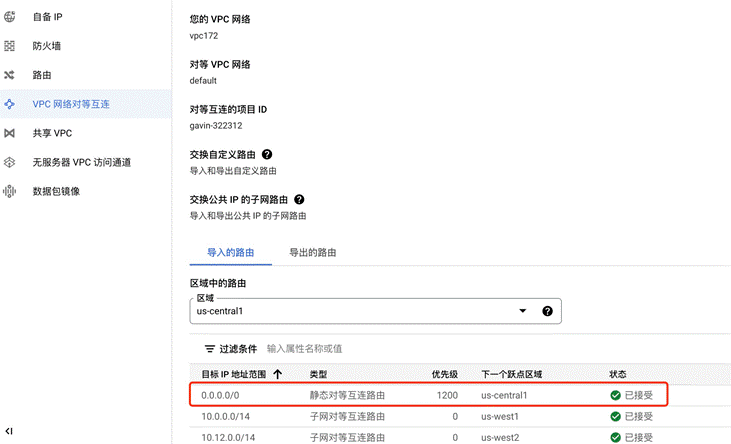
2)查看 peering 的 default 路由。这个时候业务 VPC 的默认路由就是从 VPC peering import 的路由。

注:
在中间防火墙 VPC 这里的 internal load balancer 作为默认路由优先级要低于默认互联网网关的优先级。
带有 tag 的 internal load balancer 作为下一跳的路由在 VPC peering 的情况下不支持路由导出。

4. 创建防火墙(NAT) VM
注:请先把相应网段的 cloudnat 删掉。进入虚拟机后通过 iptable 配置 SNAT,本文基于 centos。
1)安装 iptables
2)配置相关 nodepool 或者虚拟机的 SNAT,并保存。
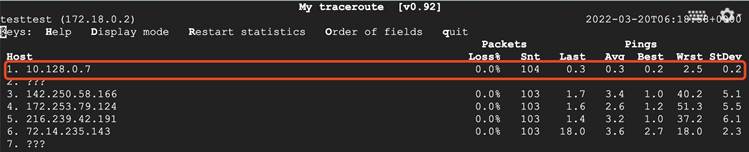
这里的 172.18.0.0/16 是跨 VPC 的 GKE 的 node 网段(这里也可以是跨 VPC 的 GKE 的 pod 的所在网段,也可以是跨 VPC 的其他想做 snat 的虚拟机或者容器的网段)。10.128.0.7 是这个 NAT VM 的 IP。
可以配置多条,命令行相同。配置后查看状态

5. 验证
跨 VPC 的结果连通性测试

路径的出口是另外一个 VPC 的防火墙 VM
总结
至此,一个企业出公网需要集中的防火墙进行处理流量的组网就搭建成功了。本文是用了 Google internal tcp/udp load balancing 可以作为路由下一跳的属性,并结合企业防火墙或者NAT的实际场景而撰写此方案。同样适用于被访问的外部对象做IP白名单的场景。在白名单场景下那么就是需要 internal tcp/udp load balancing 后的 instance group 里的 NAT 或者防火墙虚拟机有固定 ip。在专用集群场景下,如果没有防火墙和按 node pool 等资源池规划nat或者防火墙需求的场景,那么建议采用 cloud nat。此方案也适用于公共集群。
文章信息
相关推荐
精选内容

关注【谷歌云服务】
微信公众号
微信公众号
微信咨询:
周一至周五 早上 9 点到晚上 6 点
联系我们