首页 > 资源 > 文章详情
云原生之多云管理:安全可靠地访问您的 GKE 集群
背景和需求
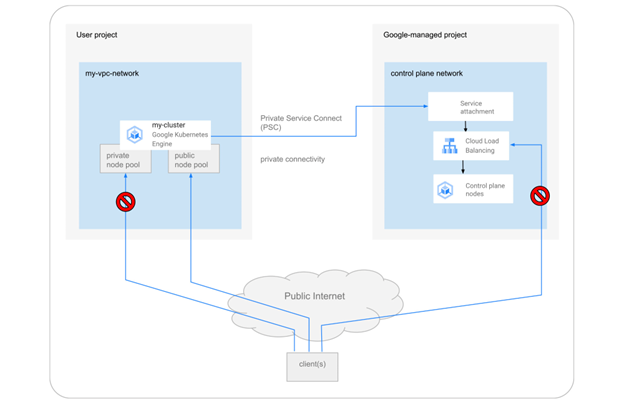
之前,所有的 Google Kubernetes Engine (GKE) 集群都使用公共 IP 地址在节点和控制平面之间进行通信。随后,我们听取了更多客户的安全担忧,并引入了通过 VPC 对等连接启用的私有集群。自 2022 年 3 月起,Google Kubernetes Engine(GKE)开始使用私有服务连接(Private Service Connect,PSC)来整合连通性类型并提高安全性。这样就可以使得一个基于 PSC 的新一致性框架,用于从集群节点连接 GKE 控制平面。此外,GKE 现在还提供控制平面和节点池级别的集群隔离,以实现更具可扩展性、安全性和经济性的集群。
使用场景
当访问 GKE 集群控制平面时,仅允许通过其私有端点。
创建或更新具有公共或私有节点的 GKE 集群节点池。
启用或禁用来自谷歌拥有的IP地址对 GKE 集群控制平面访问。
此片文章为先前文章的后续,更多场景介绍,您也可以参考之前的文章:
解决方案 #1
私有服务连接 (Private Service Connect) 允许在属于不同组、团队、项目或组织的 VPC 网络之间私有消费服务。您可以使用您定义的、内部于您的 VPC 网络的 IP 地址来发布和消费服务。您可以使用私有服务连接来访问 Google API 和服务,或另一个 VPC 网络中的托管服务。
在这个方案中,我们将通过所示的架构来创建一个 GKE 公开集群,并限制 Master 和 GKE Node 的访问,从而能够安全访问 GKE 集群。
具体步骤
gcloud container clusters create psc-test-cluster \\ --enable-private-endpoint \\ --enable-private-nodes \\ --enable-ip-alias \\ --no-enable-google-cloud-access \\ --enable-master-authorized-networks |
在 GKE Cluster 同一个 VPC 中,创建一个跳板机来访问 Master API Server。
注意:在这里,只能通过同一 VPC 的 VM 或者 GKE Node,Pod,Service 来访问 Master,这样保证了 Master 私有访问。
gcloud compute instances create instance-10 \\ --machine-type=e2-medium \\ --network-interface=network-tier=PREMIUM,subnet=default \\ --scopes=https://www.googleapis.com/auth/cloud-platform \\ --zone=us-central1-c |
SSH 进入跳板机,并安装相关组件。
gcloud compute ssh --zone "us-central1-a" "instance-10" --zone=us-central1-c
sudo apt-get install google-cloud-sdk-gke-gcloud-auth-plugin sudo apt-get install kubectl |
测试验证
连接 GKE Cluster,验证 kubectl get nodes。
gcloud container clusters get-credentials psc-test-cluster --zone us-central1-c --project flius-vpc-2
kubectl get nodes NAME STATUS ROLES AGE VERSION gke-psc-test-cluster-default-pool-3795d207-ksv9 Ready <none> 51m v1.24.10-gke.2300 gke-psc-test-cluster-default-pool-3795d207-l4wz Ready <none> 51m v1.24.10-gke.2300 gke-psc-test-cluster-default-pool-3795d207-z1lz Ready <none> 51m v1.24.10-gke.2300 |
由此可见,通过 Public GKE Cluster,并启用 --enable-private-endpoint 和 --enable-private-node 选项可以实现 Master 的私有访问和 GKE 节点的私有访问。
解决方案 #2
此方案将介绍如何访问 GKE 私有集群的控制器节点,因为它无法从公共互联网访问,但需要用于管理。默认情况下,可以通过私有端点 ( PSC ) 访问控制器,并且可以在 VPC 网络中定义授权的网络。但是,要从另一个 VPC 网络或本地访问控制器需要进行其他步骤,例如启用路由导出或创建代理。下面我们来了解有关如何在 GKE 私有集群中配置代理的解决方案。
具体步骤
首先创建一台 VM 用作于 Proxy Server 的构建,并设置相应的防火墙规则。
gcloud compute instances create --subnet=default \\ --scopes cloud-platform proxy-temp
export CLIENT_IP=`gcloud compute instances describe proxy-temp \\ --format="value(networkInterfaces[0].networkIP)"`
echo $CLIENT_IP 10.128.0.109
gcloud compute firewall-rules create k8s-proxy-ssh --network default \\ --allow tcp:22 |
创建一个私有的 GKE 集群。
gcloud container clusters create frobnitz \\ --master-ipv4-cidr=172.16.0.64/28 \\ --network default \\ --subnetwork=default \\ --enable-ip-alias \\ --enable-private-nodes \\ --enable-private-endpoint \\ --master-authorized-networks $CLIENT_IP/32 \\ --enable-master-authorized-networks |
接下来,我们来创建 Proxy Server 的配置。
mkdir k8s-api-proxy && cd k8s-api-proxy |
创建一个 Dockerfile。
vim Dockerfile
FROM alpine
RUN apk add -U curl privoxy jq && \\ mv /etc/privoxy/templates /etc/privoxy-templates && \\ rm -rf /var/cache/apk/* /etc/privoxy/* && \\ mv /etc/privoxy-templates /etc/privoxy/templates ADD --chown=privoxy:privoxy config \\ /etc/privoxy/ ADD --chown=privoxy:privoxy k8s-only.action \\ /etc/privoxy/ ADD --chown=privoxy:privoxy k8s-rewrite-internal.filter \\ /etc/privoxy/ ADD k8s-api-proxy.sh /
EXPOSE 8118/tcp
ENTRYPOINT ["./k8s-api-proxy.sh"] |
创建一个 config 文件。
vim config
#config directory confdir /etc/privoxy # Allow Kubernetes API access only actionsfile /etc/privoxy/k8s-only.action # Rewrite https://CLUSTER_IP to https://kubernetes.default filterfile /etc/privoxy/k8s-rewrite-internal.filter # Don't show the pod name in errors hostname k8s-privoxy # Bind to all interfaces, port :8118 listen-address :8118 # User cannot click-through a block enforce-blocks 1 # Allow more than one outbound connection tolerate-pipelining 1 |
创建一个 k8s-only.action 文件,其中的 CLUSTER_IP 后面会被脚本替换。
vim k8s-only.action # Block everything... {+block{Not Kubernetes}} /
# ... except the internal k8s endpoint, which you rewrite (see # k8s-rewrite-internal.filter). {+client-header-filter{k8s-rewrite-internal} -block{Kubernetes}} CLUSTER_IP/ |
创建一个 k8s-rewrite-internal.filter 文件,其中 CLUSTER_IP 后面会被脚本替换。
vim k8s-rewrite-internal.filter CLIENT-HEADER-FILTER: k8s-rewrite-internal\\ Rewrite https://CLUSTER_IP/ to https://kubernetes.default/ s@(CONNECT) CLUSTER_IP:443\\ (HTTP/\\d\\.\\d)@$1 kubernetes.default:443 $2@ig |
创建 k8s-api-proxy.sh 文件。
vim k8s-api-proxy.sh
#!/bin/sh
set -o errexit set -o pipefail set -o nounset
# Get the internal cluster IP export TOKEN=$(cat /run/secrets/kubernetes.io/serviceaccount/token) INTERNAL_IP=$(curl -H "Authorization: Bearer $TOKEN" -k -SsL https://kubernetes.default/api | jq -r '.serverAddressByClientCIDRs[0].serverAddress')
# Replace CLUSTER_IP in the rewrite filter and action file sed -i "s/CLUSTER_IP/${INTERNAL_IP}/g"\\ /etc/privoxy/k8s-rewrite-internal.filter sed -i "s/CLUSTER_IP/${INTERNAL_IP}/g"\\ /etc/privoxy/k8s-only.action
# Start Privoxy un-daemonized privoxy --no-daemon /etc/privoxy/config |
赋予 k8s-api-proxy.sh 执行权限。
chmod +x k8s-api-proxy.sh |
利用 Cloud Build 构建容器镜像,并推送到 gcr.io 容器镜像仓库。
export PROJECT_ID=flius-vpc-2
gcloud builds submit --tag=gcr.io/$PROJECT_ID/k8s-api-proxy:0.1
|
SSH 进入 Proxy Server 的 VM,并获取 GKE Cluster 的连接信息。
gcloud compute ssh proxy-temp sudo apt-get install kubectl sudo apt-get install google-cloud-sdk-gke-gcloud-auth-plugin
export PROJECT_ID=`gcloud config list --format="value(core.project)"`
gcloud container clusters get-credentials frobnitz --zone us-central1-c --internal-ip |
在 GKE 集群中部署 Proxy Server。
kubectl run k8s-api-proxy --image=gcr.io/$PROJECT_ID/k8s-api-proxy:0.1 --port=8118 |
把 Proxy Server 暴露成 ILB(GCP 内部负载均衡器)。
cat <<EOF | kubectl apply -f - apiVersion: v1 kind: Service metadata: labels: run: k8s-api-proxy name: k8s-api-proxy namespace: default annotations: cloud.google.com/load-balancer-type: "Internal" spec: ports: - port: 8118 protocol: TCP targetPort: 8118 selector: run: k8s-api-proxy type: LoadBalancer EOF
kubectl get service/k8s-api-proxy NAME TYPE CLUSTER-IP EXTERNAL-IP PORT(S) AGE k8s-api-proxy LoadBalancer 10.28.2.170 10.128.0.113 8118:32020/TCP 4m56s
export LB_IP=`kubectl get service/k8s-api-proxy \\ -o jsonpath='{.status.loadBalancer.ingress[].ip}'`
echo $LB_IP 10.128.0.113 |
获取 GKE Master 的地址。
export CONTROLLER_IP=`gcloud container clusters describe frobnitz \\ --zone=us-central1-c \\ --format="get(privateClusterConfig.privateEndpoint)"` echo $CONTROLLER_IP 172.16.0.66 |
用 curl 来测试 Master 的连接正常。
curl -k -x $LB_IP:8118 https://$CONTROLLER_IP/version { "major": "1", "minor": "24", "gitVersion": "v1.24.10-gke.2300", "gitCommit": "1d7ae0799b40b0cd95502e3a5e698db62572e341", "gitTreeState": "clean", "buildDate": "2023-02-22T09:28:49Z", "goVersion": "go1.19.6 X:boringcrypto", "compiler": "gc", "platform": "linux/amd64" } |
创建另一台 VM。
gcloud compute instances create instance-10 \\ --machine-type=e2-medium \\ --network-interface=network-tier=PREMIUM,subnet=default \\ --scopes=https://www.googleapis.com/auth/cloud-platform \\ --zone=us-central1-c
gcloud compute ssh instance-10
gcloud container clusters get-credentials frobnitz --zone us-central1-c --project flius-vpc-2 |
测试验证
验证通过 Proxy Server,能够访问到 GKE 私有集群的 Master。
export https_proxy=$LB_IP:8118 #这里LB_IP是之前创建的ILB的IP
kubectl cluster-info Kubernetes control plane is running at https://172.16.0.66 GLBCDefaultBackend is running at https://172.16.0.66/api/v1/namespaces/kube-system/services/default-http-backend:http/proxy KubeDNS is running at https://172.16.0.66/api/v1/namespaces/kube-system/services/kube-dns:dns/proxy Metrics-server is running at https://172.16.0.66/api/v1/namespaces/kube-system/services/https:metrics-server:/proxy |
总结
本文介绍了两种安全可靠的访问 GKE 集群的解决方案,第一种通过设置 GKE 集群的 --enable-private-endpoint 和 --enable-private-node 选项来保证集群 Master 和节点的安全访问;第二种通过 Proxy Server 来代理对私有 endpoint 的访问。两种方案可以根据您的具体网络拓扑和安全需求来进行选择。后续我们 GKE 将会有针对私有集群的 PSC 支持的功能发布,我们将再做具体的方案介绍。
文章信息
相关推荐
精选内容

关注【谷歌云服务】
微信公众号
微信公众号
微信咨询:
周一至周五 早上 9 点到晚上 6 点
联系我们