目录
背景和需求
前提条件
解决方案 #1
1. 将预置的 Kubernetes api-server service 发布成 Internal Load Balancer
2. 创建 nginx 服务作为 kubernetes 的反向代理
3. 创建 kubeconfig
4. 验证
5. 完整的自动化脚本
解决方案 #2
1. 创建第三方云和 Google Cloud 的连接
2. 验证第三方云访问 GKE API server
解决方案 #3
总结
背景和需求
如今,一些用户在使用多云的环境时,希望采用统一的发布平台来实现多云的控制和资源管理。在 GCP 的网络架构中,有的用户希望通过一个 VPC 作为 Hub,来提供对后端的GKE集群进行访问。
在下面的网络架构中,大家可以看到,在 GCP Hub VPC 和第三方云 VPC 和之间已经用专线打通,由于后端的 GKE VPC2 和 GKE 控制面 VPC3 之间是 Peer,但是 GKE 私有集群 Master 的 VPC Peer 不可见亦不可配置,所以从第三方云 VPC 无法直接访问 GKE 控制面的 API Server,造成了发布平台管理的困难。

为了解决上诉问题,我们可以考虑采用以下的几种解决方案。
前提条件
在进行实验之前,请确保以下的环境和设置都已经准备好。这里我们使用gcloud命令行进行配置,当然你也可以选择使用在UI页面上操作和配置。
1.创建跳板机
gcloud compute instances create jumpbox --project=flius-vpc-2 --zone=europe-west3-c --machine-type=e2-medium --network-interface=network-tier=PREMIUM,subnet=default --service-account=647512629680-compute@developer.gserviceaccount.com --scopes=https://www.googleapis.com/auth/devstorage.read_only,https://www.googleapis.com/auth/logging.write,https://www.googleapis.com/auth/monitoring.write,https://www.googleapis.com/auth/servicecontrol,https://www.googleapis.com/auth/service.management.readonly,https://www.googleapis.com/auth/trace.append --create-disk=auto-delete=yes,boot=yes,device-name=jumpbox,image=projects/debian-cloud/global/images/debian-10-buster-v20220310,mode=rw,size=10,type=projects/flius-vpc-2/zones/us-central1-a/diskTypes/pd-balanced
Created [https://www.googleapis.com/compute/v1/projects/flius-vpc-2/zones/europe-west3-c/instances/jumpbox]. NAME ZONE MACHINE_TYPE PREEMPTIBLE INTERNAL_IP EXTERNAL_IP STATUS jumpbox europe-west3-c e2-medium 10.156.0.8 34.159.42.248 RUNNING |
2. 创建 GKE 私有集群并设置私有集群 Master 对跳板机授权网络配置
gcloud beta container --project "flius-vpc-2" clusters create "private-cluster-test" --zone "us-central1-c" --machine-type "e2-medium" --image-type "COS_CONTAINERD" --disk-type "pd-standard" --disk-size "100" --metadata disable-legacy-endpoints=true --scopes "https://www.googleapis.com/auth/devstorage.read_only","https://www.googleapis.com/auth/logging.write","https://www.googleapis.com/auth/monitoring","https://www.googleapis.com/auth/servicecontrol","https://www.googleapis.com/auth/service.management.readonly","https://www.googleapis.com/auth/trace.append" --max-pods-per-node "110" --num-nodes "1" --logging=SYSTEM,WORKLOAD --monitoring=SYSTEM --enable-private-nodes --master-ipv4-cidr "192.168.50.0/28" --enable-ip-alias --network "projects/flius-vpc-2/global/networks/default" --subnetwork "projects/flius-vpc-2/regions/us-central1/subnetworks/default" --no-enable-intra-node-visibility --default-max-pods-per-node "110" --enable-master-authorized-networks --master-authorized-networks 34.159.42.248/32 --addons HorizontalPodAutoscaling,HttpLoadBalancing --enable-autoupgrade --enable-autorepair --max-surge-upgrade 1 --max-unavailable-upgrade 0 --node-locations "us-central1-c" |
3. VPC 防火墙配置
gcloud compute firewall-rules create allow-rdp-ingress-from-iap --direction=INGRESS --action=allow --rules=tcp:3389 --source-ranges=35.235.240.0/20
gcloud compute firewall-rules create allow-ssh-ingress-from-iap --direction=INGRESS --action=allow --rules=tcp:22 --source-ranges=35.235.240.0/20 |
解决方案 #1
虽然 GKE VPC 不可见也不可配置,但可以考虑通过 Internal Load Balancer 暴露 GKE API Server,再通过 Nginx 反向代理发布 API Server,并最终通过自动化脚本来进行 Nginx 的创建和配置。

下面我们来看看具体怎么实现,首先我们通过手工创建和配置。
1. 将预置的 Kubernetes api-server service 发布成 Internal Load Balancer
kubectl edit svc kubernetes
apiVersion: v1 kind: Service metadata: annotations: cloud.google.com/neg: '{"ingress":true}' networking.gke.io/load-balancer-type: Internal … spec: type: LoadBalancer
kubectl get svc NAME TYPE CLUSTER-IP EXTERNAL-IP PORT(S) AGE kubernetes LoadBalancer 10.40.0.1 10.128.0.26 443:30024/TCP 2d20h |
2. 创建 nginx 服务作为 kubernetes 的反向代理,并开启 ssl
创建 PVC
apiVersion: v1 kind: PersistentVolumeClaim metadata: name: nginx-pvc spec: storageClassName: standard accessModes: - ReadWriteOnce resources: requests: storage: 1Gi |
创建 Deployment
apiVersion: apps/v1 kind: Deployment metadata: name: nginx spec: selector: matchLabels: app: nginx replicas: 2 template: metadata: labels: app: nginx spec: volumes: - name: nginx-pvc persistentVolumeClaim: claimName: nginx-pvc containers: - name: nginx image: nginx volumeMounts: - mountPath: "/etc/nginx/conf.d" name: nginx-pvc |
创建 Service 并指定为 Internal Load Balancer
apiVersion: v1 kind: Service metadata: annotations: cloud.google.com/neg: '{"ingress":true}' networking.gke.io/load-balancer-type: Internal labels: app: nginx name: nginx namespace: default spec: ports: - port: 443 selector: app: nginx type: LoadBalancer |
查找 Nginx Pod 的 GKE 节点
kubectl get po -o wide NAME READY STATUS RESTARTS AGE IP NODE NOMINATED NODE READINESS GATES nginx-855dcccf78-l8pqj 1/1 Running 0 56m 10.36.8.5 gke-private-cluster-default-pool-a9966b2c-gq92 <none> <none> |
进入 Nginx 的 Pod
kubectl exec -it nginx-855dcccf78-l8pqj – bash root@nginx-855dcccf78-l8pqj:/# cd /etc/nginx/conf.d/ |
生成 key,crt,pem
openssl req -x509 -nodes -days 365 -newkey rsa:2048 -keyout /etc/nginx/cert.key -out /etc/nginx/cert.crt cat cert.crt cert.key > server.pem |
获取 PVC 的 Volume
kubectl get pvc NAME STATUS VOLUME CAPACITY ACCESS MODES STORAGECLASS AGE nginx-pvc Bound pvc-7da8c220-9819-4b60-885d-8eb467af6fd0 1Gi RWO standard 52m |
ssh 进入到挂载了 PVC 的 GKE 节点
注:这个步骤主要是为了修改 nginx 的配置文件和生成证书,你也可以进入 nginx 的 pod 中完成
gcloud beta compute ssh --zone "us-central1-b" "gke-private-cluster-default-pool-a9966b2c-gq92" --tunnel-through-iap --project "flius-vpc-2" |
进入 Volume
mount | grep pvc-7da8c220-9819-4b60-885d-8eb467af6fd0 # pvc volume
/dev/sdb on /var/lib/kubelet/pods/e436a6cb-422e-4d4e-bc01-9e739ae526b5/volumes/kubernetes.io~gce-pd/pvc-7da8c220-9819-4b60-885d-8eb467af6fd0 type ext4 (rw,relatime) …
cd /var/lib/kubelet/pods/e436a6cb-422e-4d4e-bc01-9e739ae526b5/volumes/kubernetes.io~gce-pd/pvc-7da8c220-9819-4b60-885d-8eb467af6fd0 |
创建 nginx 的配置文件 default.conf
vi default.conf server {
listen 443; server_name 10.128.0.28;
ssl_certificate /etc/nginx/conf.d/cert.crt; ssl_certificate_key /etc/nginx/conf.d/cert.key;
ssl on; ssl_session_cache builtin:1000 shared:SSL:10m; ssl_protocols TLSv1 TLSv1.1 TLSv1.2; ssl_ciphers HIGH:!aNULL:!eNULL:!EXPORT:!CAMELLIA:!DES:!MD5:!PSK:!RC4; ssl_prefer_server_ciphers on;
access_log /var/log/nginx/jenkins.access.log;
location / {
proxy_set_header Host $host; proxy_set_header X-Real-IP $remote_addr; proxy_set_header X-Forwarded-For $proxy_add_x_forwarded_for; proxy_set_header X-Forwarded-Proto $scheme;
# Fix the "It appears that your reverse proxy set up is broken" error. proxy_pass https://192.168.20.2; proxy_read_timeout 90; proxy_redirect https://10.128.0.28 https://192.168.20.2;
} } |
注:10.128.0.28 是 nginx ilb 的 ip 地址,192.168.20.2 是 GKE 控制面的 ip 地址
重启 nginx
3.创建 kubeconfig
创建一个新的 Kubernetes Service Account 来连接集群
gcloud container clusters get-credentials private-cluster --region us-central1 --project flius-vpc-2
kubectl create serviceaccount my-ksa
kubectl create clusterrolebinding my-view-binding-1 --clusterrole view --serviceaccount default:my-ksa
kubectl create clusterrolebinding my-node-reader-binding-1 --clusterrole node-reader --serviceaccount default:my-ksa
kubectl create clusterrolebinding my-cluster-admin-binding-1 --clusterrole cluster-admin --serviceaccount default:my-ksa
server=https://10.128.0.28 name=$(kubectl get serviceaccount my-ksa -o jsonpath='{$.secrets[0].name}') ca=$(kubectl get secret/$name -o jsonpath='{.data.ca.crt}') token=$(kubectl get secret/$name -o jsonpath='{.data.token}' | base64 --decode) namespace=$(kubectl get secret/$name -o jsonpath='{.data.namespace}' | base64 --decode)
echo " apiVersion: v1 kind: Config clusters: - name: default-cluster cluster: certificate-authority-data: : ${ca} server: ${server} contexts: - name: default-context context: cluster: default-cluster namespace: default user: default-user current-context: default-context users: - name: default-user user: token: : ${token} " > my-ksa.kubeconfig |
完整的 kubeconfig 如下
apiVersion: v1 kind: Config clusters: - name: default-cluster cluster: certificate-authority-data: ****** server: https://10.128.0.28 contexts: - name: default-context context: cluster: default-cluster namespace: default user: default-user current-context: default-context users: - name: default-user user: token: ****** |
4. 验证
在其他云 VPC 的虚机上验证拷贝上一步生成的 kubeconfig 到第三方云 VPC 中需要访问 GKE Master API Server 的虚机上,再验证以下命令
用 curl 验证
curl --cacert server.pem https://10.128.0.28 -H "Authorization: Bearer <上一步的token>"
#返回200 |
注:server.pem 为第 2 步中创建生成的
5. 完整的自动化脚本
static_ip=<static ip> #指定一个静态的loadBalancer地址 region=us-central1 #指定region project_id=<project id> #指定project id api_server_ip=$(kubectl get endpoints kubernetes -o jsonpath={.subsets[0].addresses[0].ip})
gcloud beta compute addresses create nginx-static-ilb-ip --project=$project_id --subnet=default --addresses=$static_ip --region=$region --purpose=SHARED_LOADBALANCER_VIP
#生成key, crt, cert openssl req -x509 -nodes -days 365 -subj /CN=${static_ip} -newkey rsa:2048 -keyout cert.key -out cert.crt cat cert.crt cert.key > server.pem
#生成secret kubectl create secret tls nginx-secret-tls --cert=cert.crt --key=cert.key
#生成nginx.conf cat <<EOF > nginx.conf server {
listen 443; server_name ${static_ip};
ssl_certificate /etc/nginx/cert/tls.crt; ssl_certificate_key /etc/nginx/cert/tls.key;
ssl on; ssl_session_cache builtin:1000 shared:SSL:10m; ssl_protocols TLSv1 TLSv1.1 TLSv1.2; ssl_ciphers HIGH:!aNULL:!eNULL:!EXPORT:!CAMELLIA:!DES:!MD5:!PSK:!RC4; ssl_prefer_server_ciphers on;
access_log /var/log/nginx/access.log;
location / {
proxy_set_header Host $host; proxy_set_header X-Real-IP $remote_addr; proxy_set_header X-Forwarded-For $proxy_add_x_forwarded_for; proxy_set_header X-Forwarded-Proto $scheme;
# Fix the "It appears that your reverse proxy set up is broken" error. proxy_pass https://${api_server_ip}; proxy_read_timeout 90; proxy_redirect https://${static_ip} https://${api_server_ip};
} } EOF
kubectl create configmap nginx-conf --from-file=nginx.conf=nginx.conf
cat <<EOF > deployment.yaml apiVersion: apps/v1 kind: Deployment metadata: name: nginx spec: selector: matchLabels: app: nginx replicas: 2 template: metadata: labels: app: nginx spec: volumes: - name: nginx-conf configMap: name: nginx-conf items: - key: nginx.conf path: nginx.conf - name: nginx-secret secret: secretName: nginx-secret-tls containers: - name: nginx image: nginx volumeMounts: - name: nginx-conf mountPath: /etc/nginx/conf.d/nginx.conf subPath: nginx.conf readOnly: true - name: nginx-secret mountPath: "/etc/nginx/cert" readOnly: true EOF
cat <<EOF > service.yaml apiVersion: v1 kind: Service metadata: annotations: cloud.google.com/neg: '{"ingress":true}' networking.gke.io/load-balancer-type: Internal labels: app: nginx name: nginx namespace: default spec: ports: - port: 443 selector: app: nginx type: LoadBalancer loadBalancerIP: $static_ip EOF
kubectl apply -f . |
解决方案 #2
Interconnect + Cloud VPN 方案架构图
架构说明:
本方案是通过第三方云和 Google cloud 的 GKE google managed vpc 私有网络打通,从而实现从第三方云访问 GKE master api server。由于 GKE master 是 Google managed vpc 不可见,但是 GKE node pool 有 vpc peering 关系,我们充分利用了 vpc peering 的路由 import 和 export,同时将 GKE master 网段通过 bgp 发布给第三方云,整个方案全部托管服务。以下是具体的步骤。
1. 创建第三方云和 Google Cloud 的 Interconnect 或者 VPN 连接,本文用 VPN 作为一个连接环境。
注:以下步骤可以用命令行,这里只是用 Console UI 是为了让大家更好的理解。
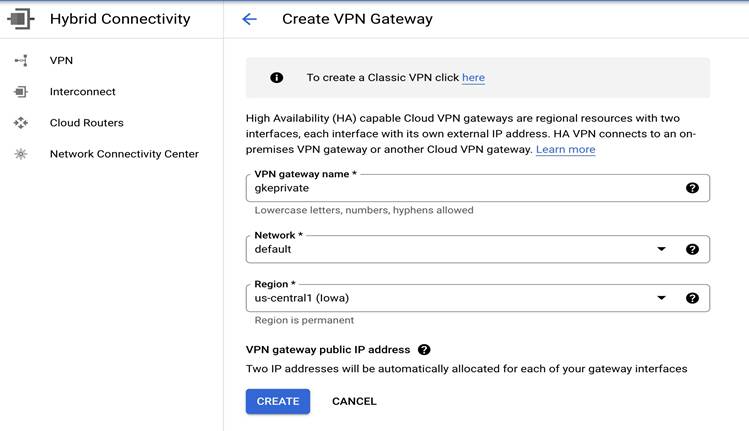
1)在 Google Cloud 上创建 VPN Gateway
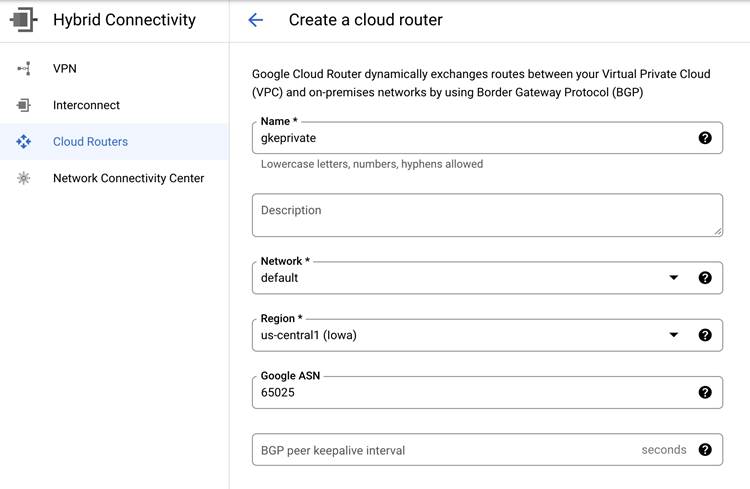
2)在 Google Cloud 上创建 Cloud Router
3)第三方云创建完 VPN 相关配置后,本地创建 Custom Gateway
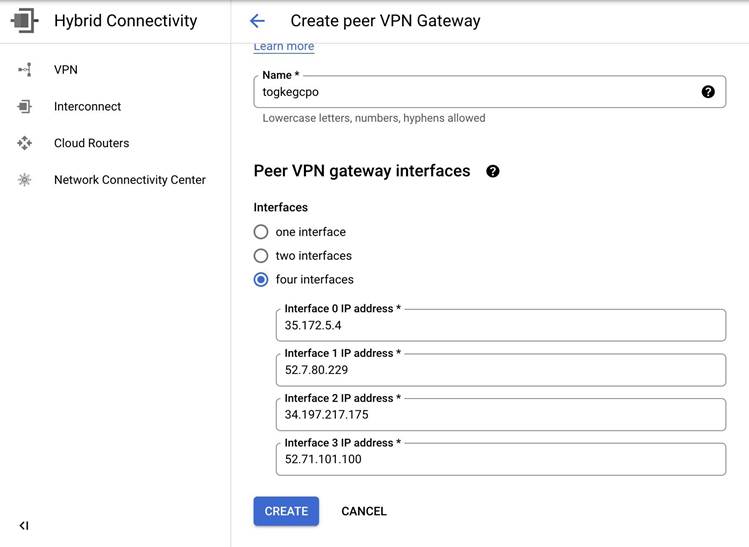
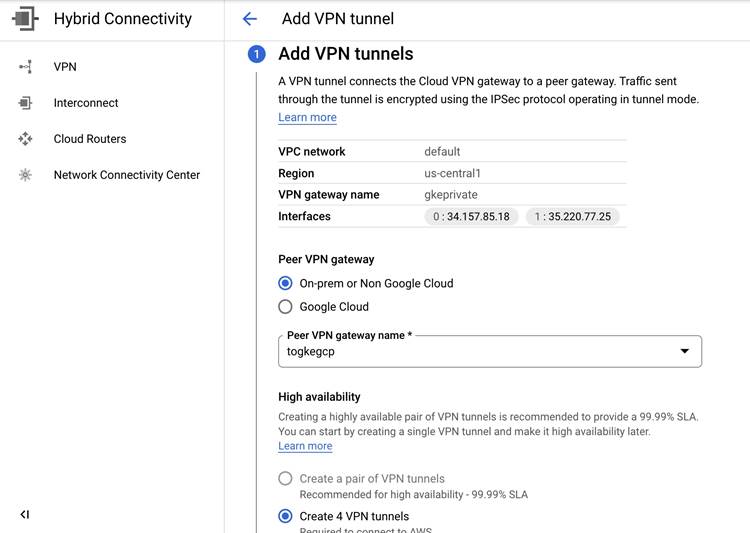
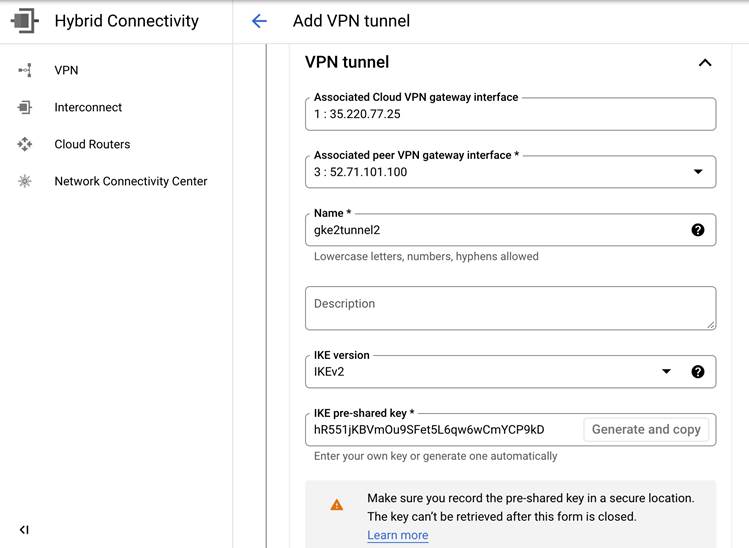
4)Google Cloud 上创建 VPN Tunnel,一共需要创建四条 Tunnel,这里只截图其中一个配置,其他配置同理配置,这里注意 psk 是要第三方云生成的 key 填写到 Google Cloud 上。
5)Google Cloud 配置 BGP session,本文案例创建了四个 bgp session,这里只截取其中一个。

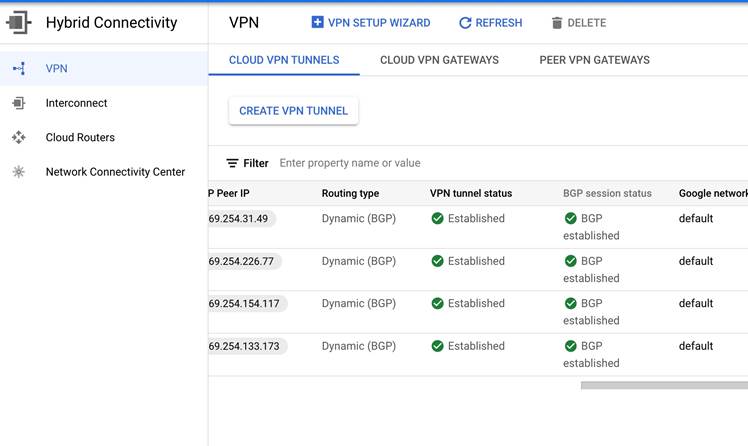
6)Google Cloud VPN 和 BGP 配置完成后,可以看见如下的状态。
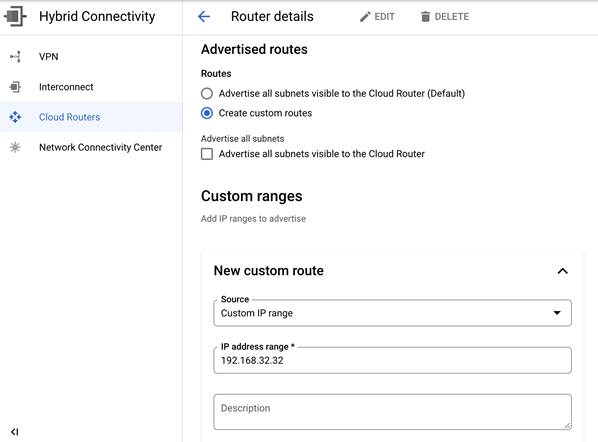
7)Google Cloud Clud Router 进 Custom Route 发布 GKE Master 网段路由。
8)在 VPC Network Peering 找到对应的 GKE Master 的 VPC Peering,修改并勾选 import 和 export routes 如下,以允许 GKE Master 的网段路由和第三方云的路由学习。
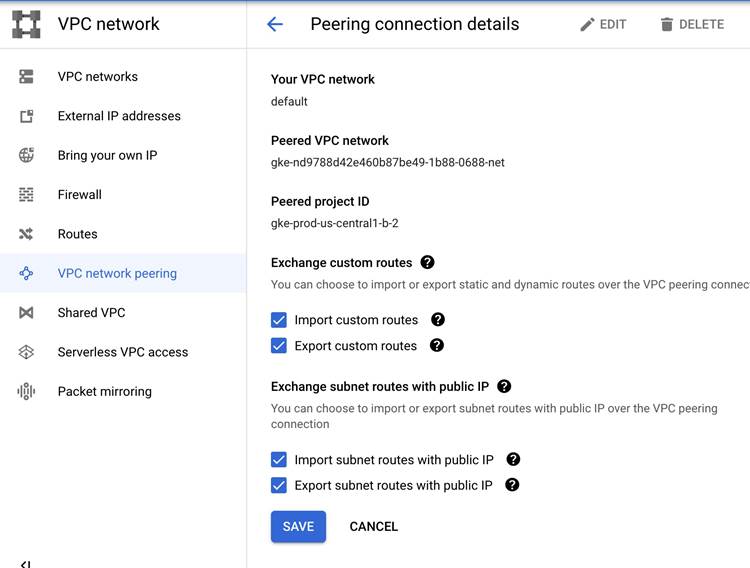
9)以上操作完成后你将看到 import 的路由里包括 GKE 网段的,export 路由里包括第三方云的网段,也可以同时查看 GCP 和第三方云的路由表。
注:Google Cloud 上能看到172.31的网段,第三方云应该能看到192.168 的 GKE master 网段

2. 验证第三方云上的虚拟机访问 GKE API server。
1)创建 kubconfig
gcloud container clusters get-credentials private-cluster —zone us-central1 --project flius-vpc-2
kubectl create serviceaccount my-ksa
kubectl create clusterrolebinding my-view-binding-1 --clusterrole view --serviceaccount default:my-ksa
kubectl create clusterrolebinding my-node-reader-binding-1 --clusterrole node-reader --serviceaccount default:my-ksa
kubectl create clusterrolebinding my-cluster-admin-binding-1 --clusterrole cluster-admin --serviceaccount default:my-ksa |
2)第三方云上创建 VM 并安装 gcloud 命令
[root@ip-172-31-23-209 ec2-user]# kubectl get nodes NAME STATUS ROLES AGE VERSION gke-private-cluster-default-pool-a8d55aec-c7cg Ready <none> 6h13m v1.21.6-gke.1503 gke-private-cluster-default-pool-a8d55aec-n77f Ready <none> 6h13m v1.21.6-gke.1503 gke-private-cluster-default-pool-a8d55aec-p9s1 Ready <none> 6h13m v1.21.6-gke.1503 [root@ip-172-31-23-209 ec2-user]# kubectl cluster-info Kubernetes control plane is running at https://192.168.32.34 GLBCDefaultBackend is running at https://192.168.32.34/api/v1/namespaces/kube-system/services/default-http-backend:http/proxy KubeDNS is running at https://192.168.32.34/api/v1/namespaces/kube-system/services/kube-dns:dns/proxy Metrics-server is running at https://192.168.32.34/api/v1/namespaces/kube-system/services/https:metrics-server:/proxy
To further debug and diagnose cluster problems, use 'kubectl cluster-info dump'. [root@ip-172-31-23-209 ec2-user]# |
注:基于这个 VPN 的解决方案还可以解决跨 vpc 的 private service access 访问的问题。比如 Google Cloud 的 redis。同样只需要将 Private service access 对应的 VPC peering 做路由的 export 和 import,找到名字为“servicenetworking-googleapis-com”的 peering 做 import export 即可.
解决方案 #3
Private Service Connect 允许跨属于不同群组、团队、项目或组织的 VPC 网络以不公开方式使用服务。您可以使用由您定义且位于您的 VPC 网络内部的 IP 地址发布和使用服务。您可以使用 Private Service Connect 访问 Google API 和服务,或另一个 VPC 网络中的代管式服务。
这个我们下期再进行详细的介绍,敬请期待!
总结
本文讲述了重点讲述了两种解决方案来帮助用户轻松访问 GKE Master,在网络连通、安全和易用性方面都给出了相应的实践步骤,同样类似的解决方案还可以用来实现跨 VPC 访问谷歌云其他托管服务,希望能对你实现云原生多云的管理有所帮助。