Kubernetes是容器的编排工具,可以非常方便的进行大规模的容器调度。通过这种模式,将传统的软件模式改造成微服务模式。这种微服务的架构模式,将复杂系统切分为数十乃至上百个小服务,每个服务负责实现一个独立的业务逻辑。这些小服务易于被小型的软件工程师团队负责,这带来了语言和框架选择灵活性,并可以缩短应用开发上线时间,可根据不同的工作负载和资源要求对服务进行独立缩扩容等优势。但另一方面,当应用被拆分为多个微服务进程后,进程内的方法调用变成了了进程间的远程调用。这就引入了对大量服务的连接、管理和监控的复杂性。
在微服务模式中,如何实现各个进程间的通信,是微服务中一个重要的部分。
Istio是CNCF提出的由Google、IBM、Lyft等共同开源的Service Mesh框架。是连接Kubernetes和Serverless架构的重要基础设施层。
一 Istio简介
1 Istio
Isito主要实现以下三个功能:
1.监控
2.安全
3.流量管理
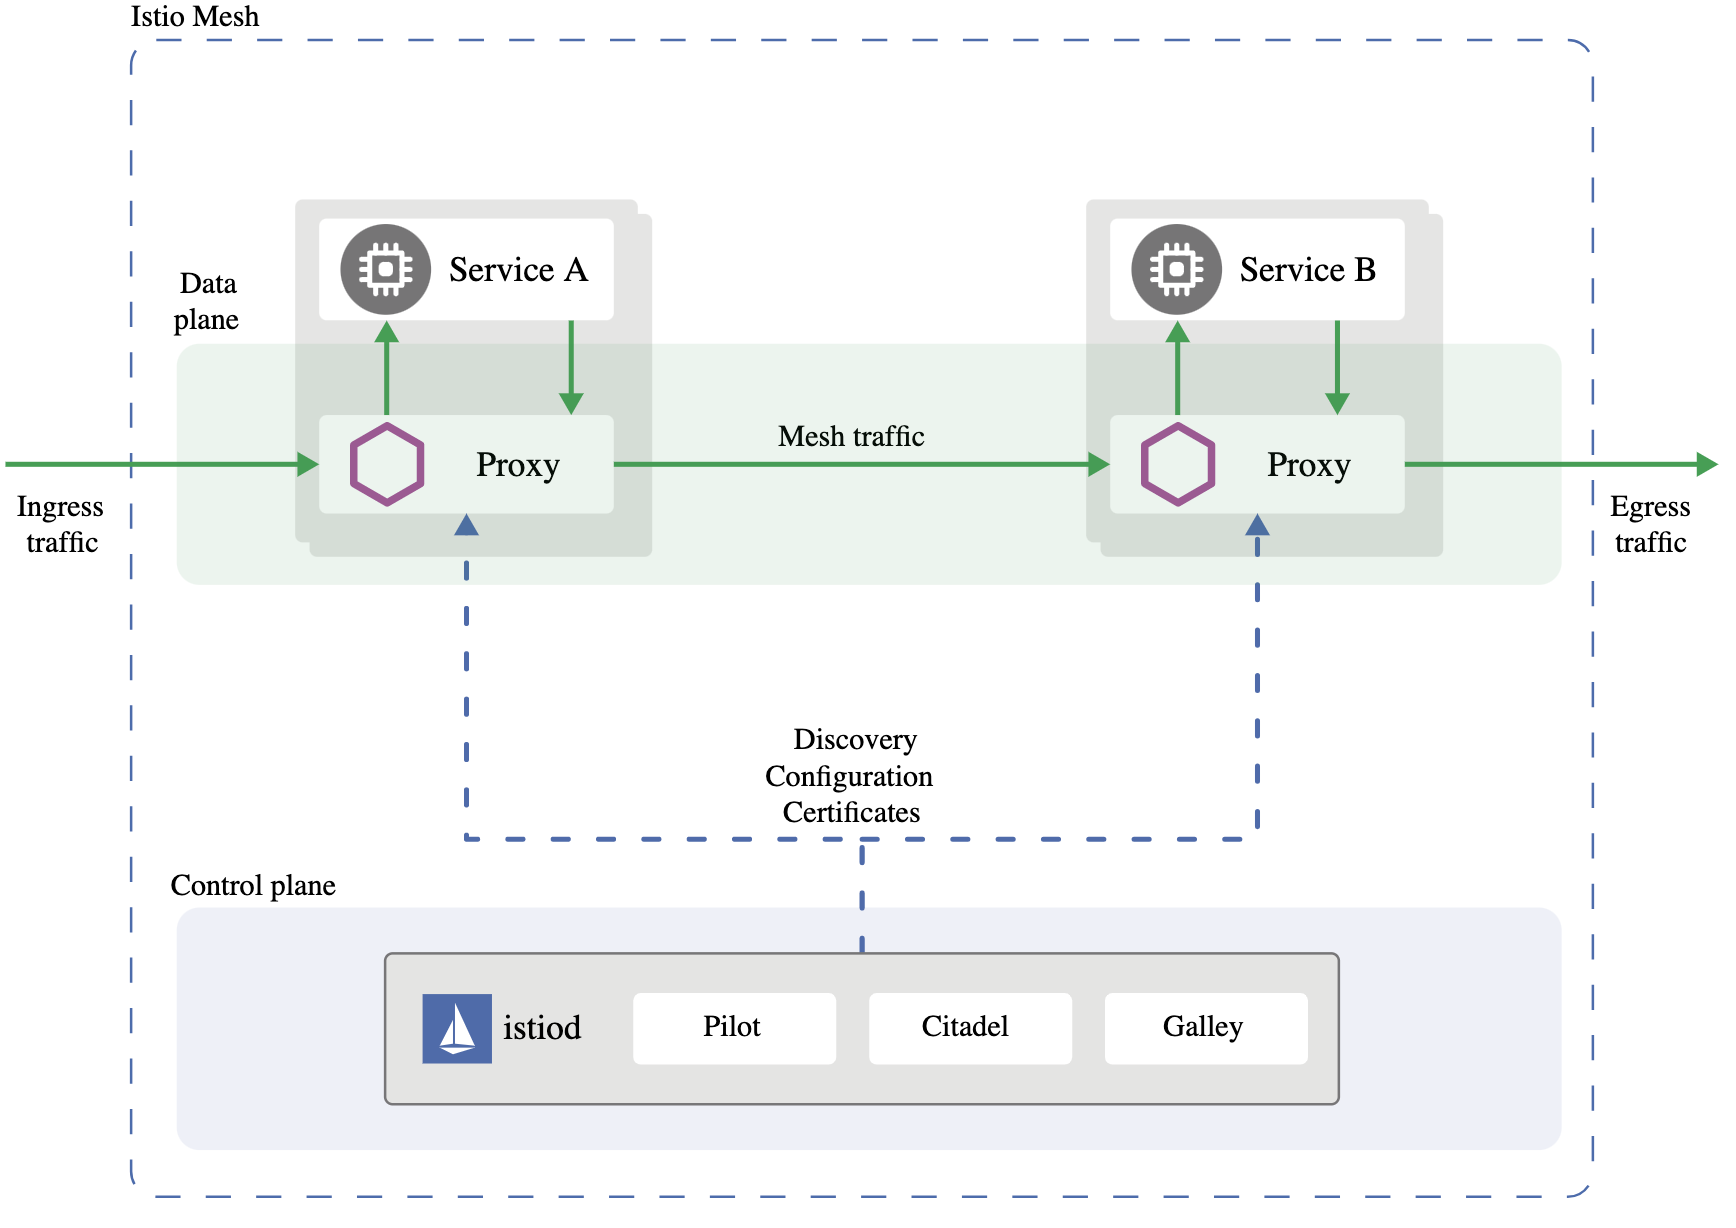
其架构图如下:
其中,Citadel是服务间认证加密的组件,Pilot是服务间通信策略的控制层面,Galley负责检查用户的策略配置。
其中Pilot是数据层面的控制组件,Proxy是数据层面的执行组件。
2 流量管理
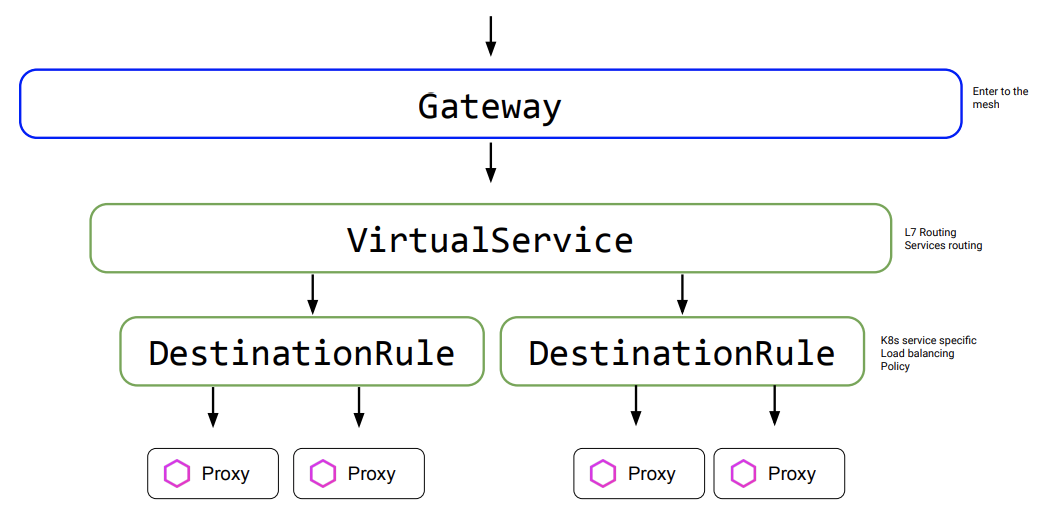
根据前面的描述,我们知道,在Istio中,流量管理通过Pilot和Envoy实现。Pilot对Envoy通过下面几个组件进行流量策略的控制:
1.Gateway - 是Istio的IngressGateway,流量通过这个Gateway进入VirtualService。
2.VirtualService - 通过
a.HTTP header
b.URIs
c.Ports
d.sourceLables
对流量进行分类,分发到不同的Service上。
3.DestinationRule -定义了流量如何分发到Pod上,比如负载均衡策略、Session Affinity等。同时还可以通过Label对同一组服务进行更细致的分组,比如ServiceA-v1、ServiceA-v2。用于流量的splitting。
本文将介绍在GKE上如何实现通过Isito实现service间流量的控制。
二 环境准备
1 GKE
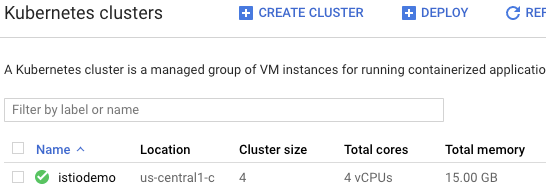
在Google Cloud上创建GKE Cluster,enable Istio,具体命令行如下:
gcloud beta container clusters create "istiodemo" --zone "us-central1-c" --num-nodes "4" --enable-stackdriver-kubernetes --enable-ip-alias --addons HttpLoadBalancing,Istio
复制代码
通过Console界面查看创建的GKE Cluster:
查看Istio相关的workload:
2 本地安装Istioctl工具
本文采用Istio1.4.3:
export ISTIO_VERSION=1.4.3curl -L https://git.io/getLatestIstio | ISTIO_VERSION=$ISTIO_VERSION sh -
复制代码
检查Istio版本
./istioctl version --shortclient version: 1.4.3control plane version: 04871014b586f671f2ce14646e5061945f75c9c5data plane version: (1 proxies)
复制代码
查看istio状态:
这里采用Istio的Demo profile,可以用下面的命令:
istioctl manifest apply --set profile=demo
复制代码
可以看到各种监控的工具都安装完成:
3 安装bookinfo
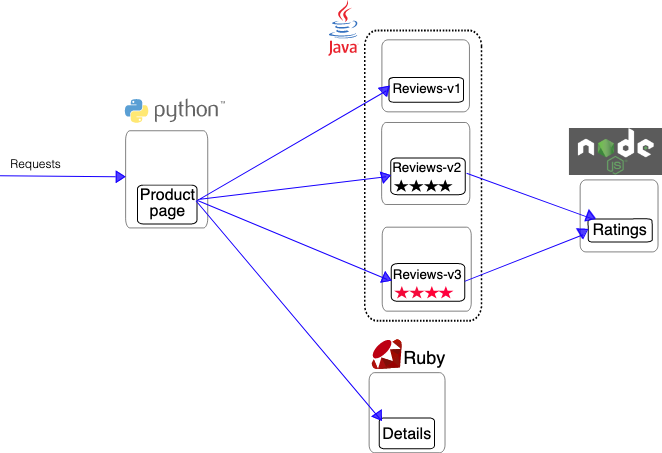
Bookinfo跟随Istio的安装包一起下载到本地目录。Bookinfo的软件架构如下:
安装过程如下:
kubectl label namespace default istio-injection=enabledkubectl apply -f samples/bookinfo/platform/kube/bookinfo.yaml
复制代码
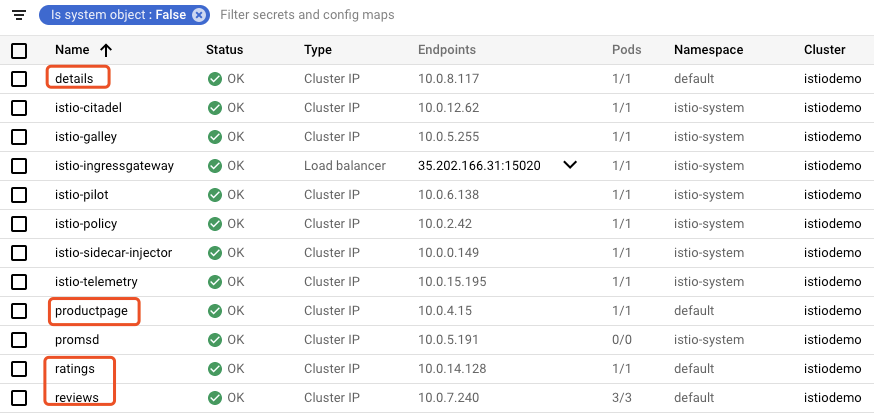
查看pod、service信息:
红框表示出来的,都是bookinfo相关的deployment。
红框表示出来的,都是bookinfo相关的service。
查看应用的状态:
kubectl exec -it $(kubectl get pod -l app=ratings-o jsonpath='{.items[0].metadata.name}')-c ratings -- curl productpage:9080/productpage| grep -o "<title>.*</title>"复制代码
Simple Bookstore App
三 通过Istio进行流量管理
1 配置Gateway和VirtualService使外部可以访问
配置Istio Ingress Gateway,使外部可以访问bookinfo:
kubectl apply -f samples/bookinfo/networking/bookinfo-gateway.yaml
复制代码
配置文件如下:
apiVersion: networking.istio.io/v1alpha3kind: Gatewaymetadata:name: bookinfo-gatewayspec:selector:istio: ingressgateway # use istio default controllerservers:- port:number: 80name: httpprotocol: HTTPhosts:- "*"---apiVersion: networking.istio.io/v1alpha3kind: VirtualServicemetadata:name: bookinfospec:hosts:- "*"gateways:- bookinfo-gatewayhttp:- match:- uri:exact: /productpage- uri:prefix: /static- uri:exact: /login- uri:exact: /logout- uri:prefix: /api/v1/productsroute:- destination:host: productpageport:number: 9080
复制代码
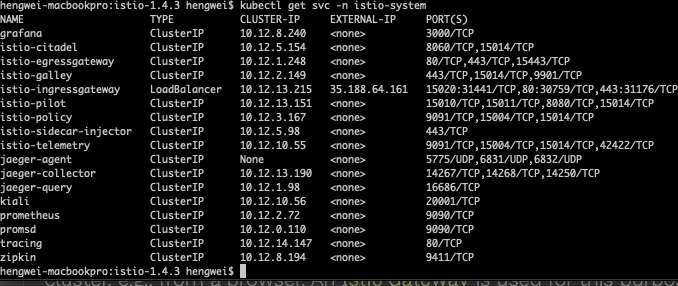
查看GW的公网地址:
kubectl get svc -n istio-systemNAME TYPE CLUSTER-IP EXTERNAL-IPistio-citadel ClusterIP 10.0.12.62 <none>istio-galley ClusterIP 10.0.5.255 <none>istio-ingressgateway LoadBalancer 10.0.13.240 35.202.166.31istio-pilot ClusterIP 10.0.6.138 <none>istio-policy ClusterIP 10.0.2.42 <none>istio-sidecar-injector ClusterIP 10.0.0.149 <none>istio-telemetry ClusterIP 10.0.15.195 <none>promsd ClusterIP 10.0.5.191 <none>
复制代码
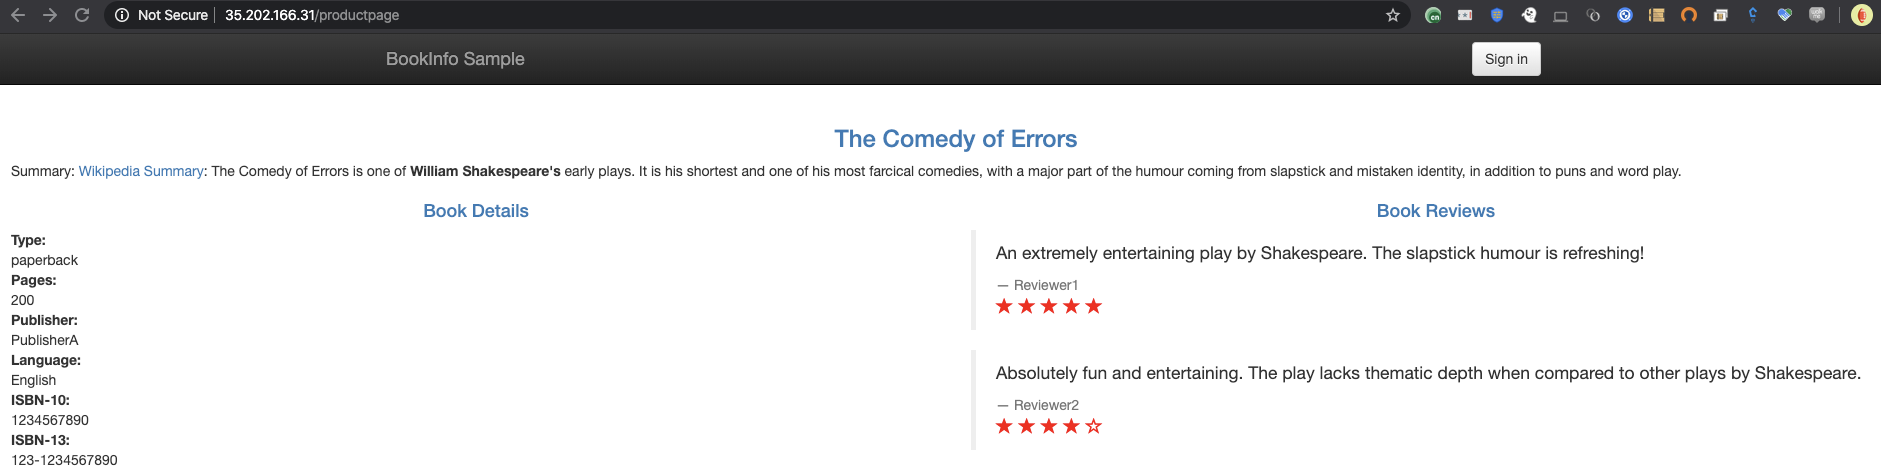
可以看到istio-ingressgateway的公网地址是35.202.166.31。通过这个IP地址访问bookinfo:
curl -s http://$Gateway_URL/productpage | grep -o "<title>.*</title>"
复制代码
Simple Bookstore App
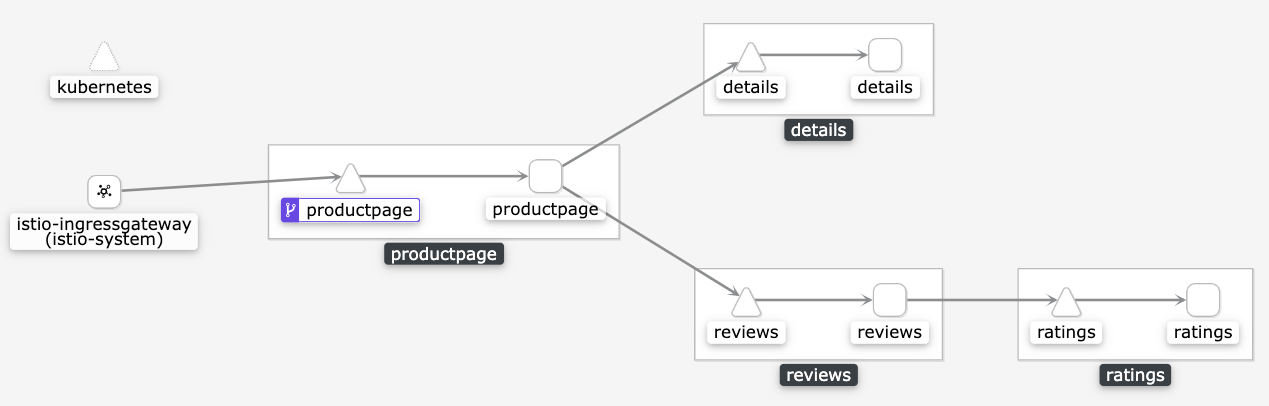
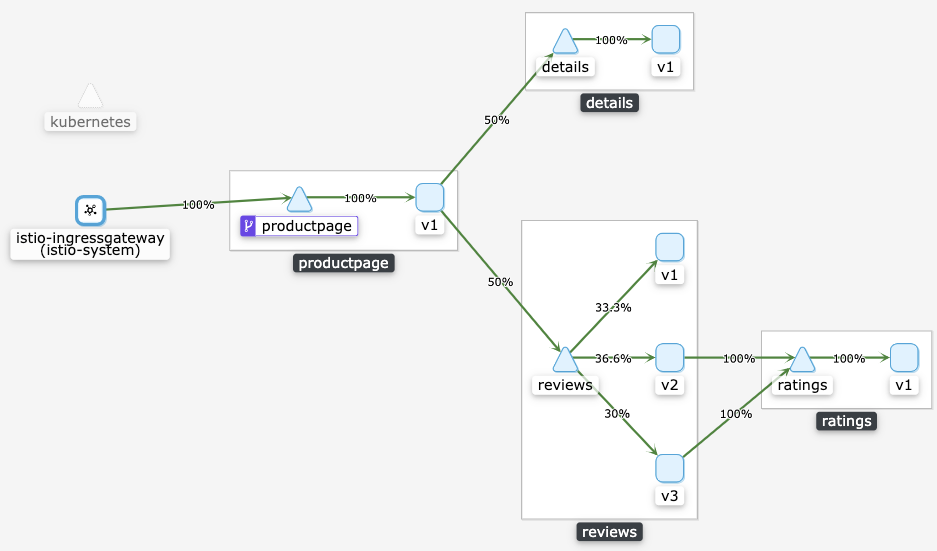
通过Kiali界面istioctl dashboard kiali: admin/admin可以看到Micro Service间拓扑关系:
2 部署DestinationRule
kubectl apply -f samples/bookinfo/networking/destination-rule-all.yaml
复制代码
配置文件内容:
apiVersion: networking.istio.io/v1alpha3kind: DestinationRulemetadata:name: productpagespec:host: productpagesubsets:- name: v1labels:version: v1---apiVersion: networking.istio.io/v1alpha3kind: DestinationRulemetadata:name: reviewsspec:host: reviewssubsets:- name: v1labels:version: v1- name: v2labels:version: v2- name: v3labels:version: v3---apiVersion: networking.istio.io/v1alpha3kind: DestinationRulemetadata:name: ratingsspec:host: ratingssubsets:- name: v1labels:version: v1- name: v2labels:version: v2- name: v2-mysqllabels:version: v2-mysql- name: v2-mysql-vmlabels:version: v2-mysql-vm---apiVersion: networking.istio.io/v1alpha3kind: DestinationRulemetadata:name: detailsspec:host: detailssubsets:- name: v1labels:version: v1- name: v2labels:version: v2---
复制代码
这个Destination Rule中包含每个子应用的不同版本。此时在刷新网页时,可以看到3个版本的Review。
通过脚本持续的访问页面:
for i in {1..100};do curl -o /dev/null -s -w %{http_code}http://35.188.64.161/productpage; sleep 1;done复制代码
此时流量是基本均担的:
3 配置VirtualService流量导向v1
kubectl apply -f samples/bookinfo/networking/virtual-service-all-v1.yaml
复制代码
配置文件内容:
apiVersion: networking.istio.io/v1alpha3kind: VirtualServicemetadata:name: productpagespec:hosts:- productpagehttp:- route:- destination:host: productpagesubset: v1---apiVersion: networking.istio.io/v1alpha3kind: VirtualServicemetadata:name: reviewsspec:hosts:- reviewshttp:- route:- destination:host: reviewssubset: v1---apiVersion: networking.istio.io/v1alpha3kind: VirtualServicemetadata:name: ratingsspec:hosts:- ratingshttp:- route:- destination:host: ratingssubset: v1---apiVersion: networking.istio.io/v1alpha3kind: VirtualServicemetadata:name: detailsspec:hosts:- detailshttp:- route:- destination:host: detailssubset: v1---
复制代码
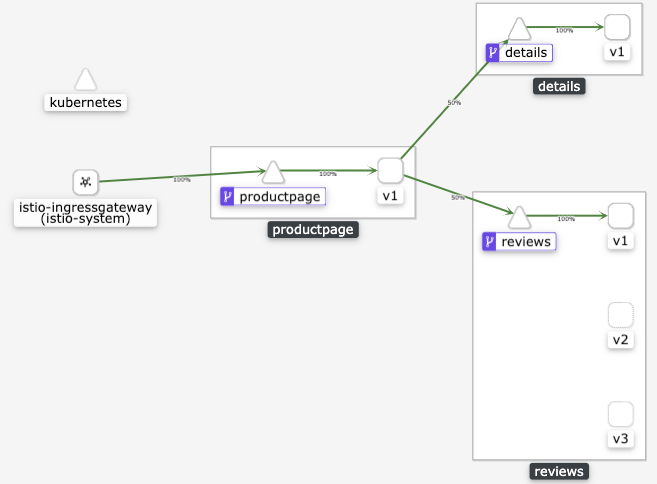
可以看到,所有的流量都导向v1的subset。包括productpage、reviews、ratings、details。此时再刷新页面,都只有相同的内容。
4 配置VirtualService通过识别http header内容进行控制流量
VirtualService可以通过http header中的内容对流量进行控制。这里采用用户名来进行控制:
kubectl apply -f samples/bookinfo/networking/virtual-service-reviews-test-v2.yaml
复制代码
配置文件内容:
apiVersion: networking.istio.io/v1alpha3kind: VirtualServicemetadata:name: reviewsspec:hosts:- reviewshttp:- match:- headers:end-user:exact: jasonroute:- destination:host: reviewssubset: v2- route:- destination:host: reviewssubset: v1
复制代码
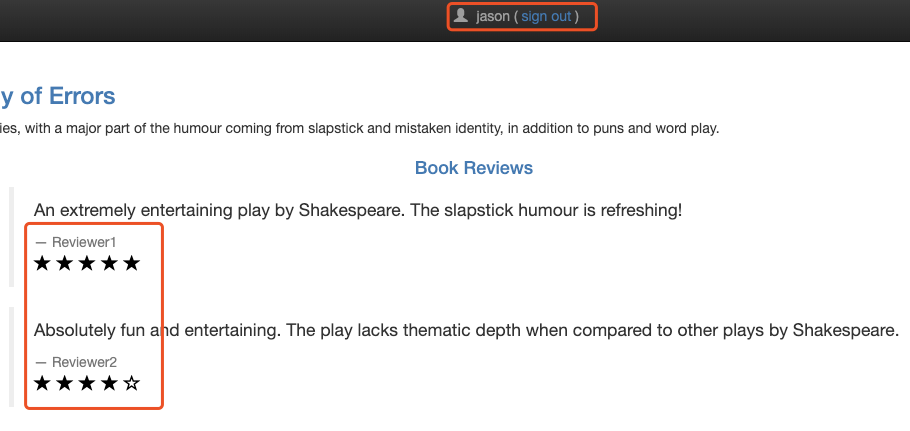
可以看到,如果用户是jason,流量将导向v2,否则导向v1.
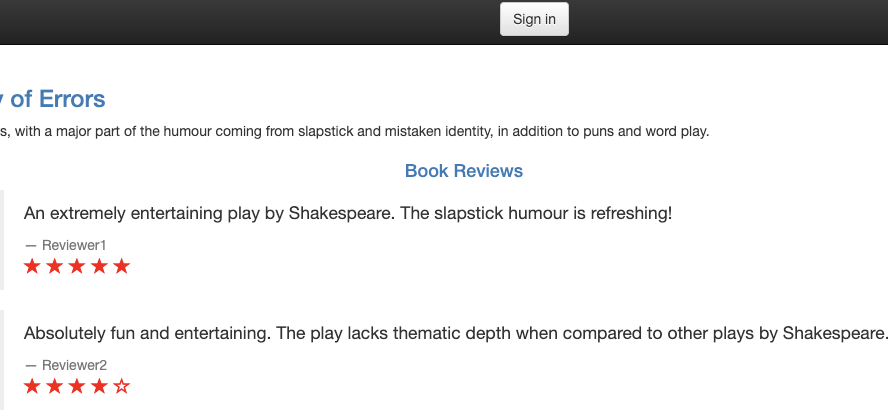
使用jason登录,可以看到review的页面是下面黑色的星星。是v2的subset。
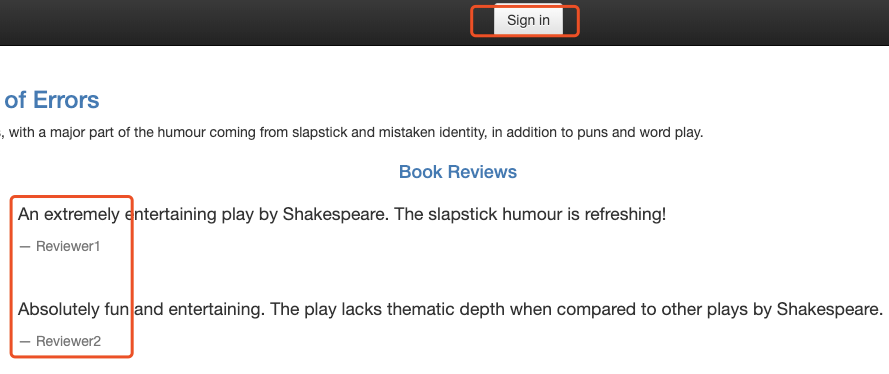
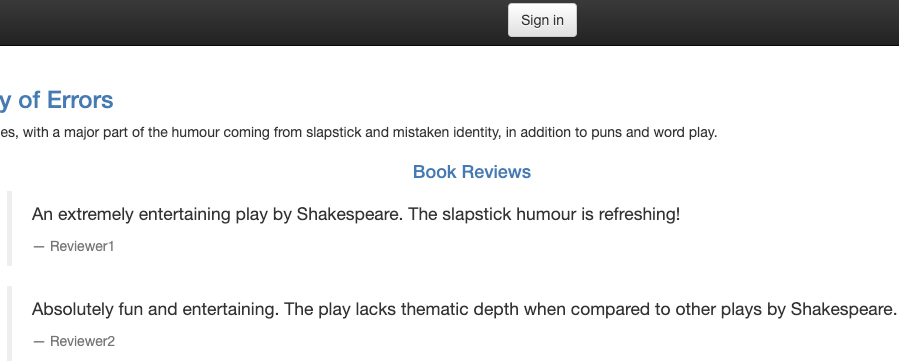
退出登录,或用随意的名字登录,都是没有星星的v1版本:
5 配置VirtualService流量导向v1和v3各一半
清除上面实验的配置:
kubectl delete -f samples/bookinfo/networking/virtual-service-all-v1.yaml
复制代码
此时流量会在3个版本间轮训。
下面的配置会只导向v1:
kubectl apply-f samples/bookinfo/networking/virtual-service-all-v1.yaml
复制代码
采用下面的配置,把流量在v1和v3间各50%分流:
kubectl apply-f samples/bookinfo/networking/virtual-service-reviews-50-v3.yaml
复制代码
配置的具体内容:
apiVersion: networking.istio.io/v1alpha3kind: VirtualServicemetadata:name: reviewsspec:hosts:- reviewshttp:- route:- destination:host: reviewssubset: v1weight: 50- destination:host: reviewssubset: v3weight: 50
复制代码
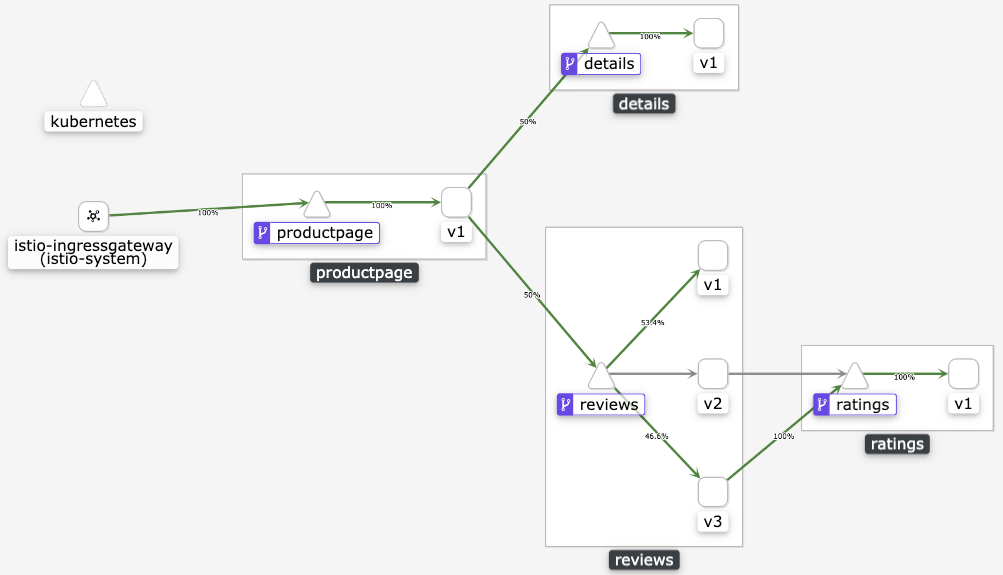
此时可以看到流量在v1和v3间轮询:
6 配置VirtualService流量导向v3
应用如下配置:
kubectl apply-f samples/bookinfo/networking/virtual-service-reviews-v3.yaml
复制代码
配置的具体内容如下:
apiVersion: networking.istio.io/v1alpha3kind: VirtualServicemetadata:name: reviewsspec:hosts:- reviewshttp:- route:- destination:host: reviewssubset: v3
复制代码
这样流量都导向v3:
7 配置VirtualService流量导向v1和v2,比例9:1
应用如下配置:
kubectl apply-f samples/bookinfo/networking/virtual-service-reviews-90-10.yaml
复制代码
配置的具体内容如下:
apiVersion: networking.istio.io/v1alpha3kind: VirtualServicemetadata:name: reviewsspec:hosts:- reviewshttp:- route:- destination:host: reviewssubset: v1weight: 90- destination:host: reviewssubset: v2weight: 10
复制代码
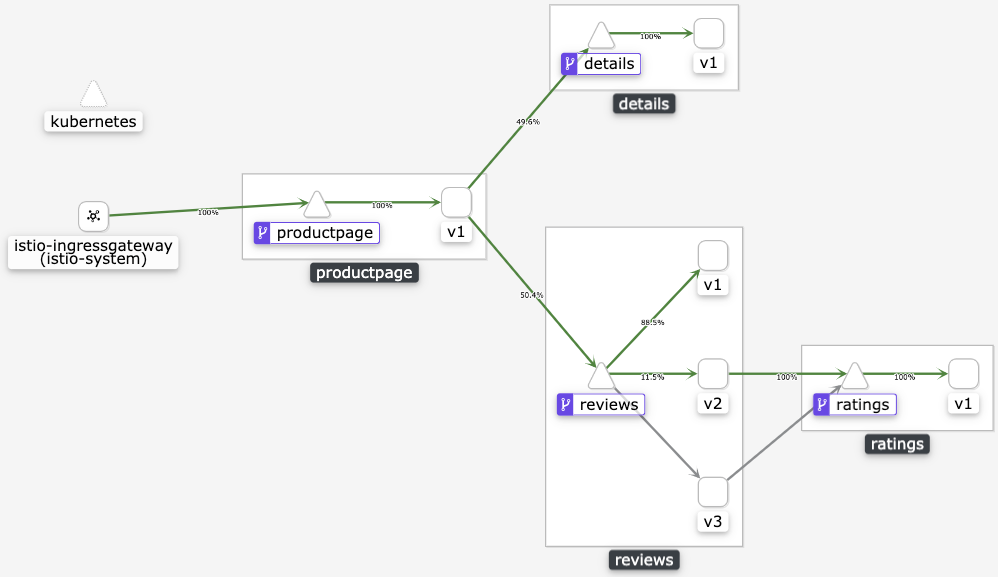
此时90%流量导向v1,10%的流量导向v2。可以通过多刷页面看到v2的黑色星星页面。
四 总结
通过在GKE上的Istio的Gateway/VirtualService/DestinationRule可以非常方便的控制各个微服务间的流量调度。